This article was written with the help of masters from the certified soundproofing studio StP-Tehno. All photo/video materials are formed for easy perception. You can purchase any materials in our store.
Also, this article contains a lot of information. We recommend stocking up with tea and cookies)
Enjoy reading!
It’s worth noting right away that we won’t tell you that you need to thoroughly wash the doors, degrease and blah blah blah ... This is a no brainer.
Most important points things to know:
1. Do not try to climb where you cannot physically climb. It is normal to roll the material in these places, you will not succeed.
2. Do not roll up the amplifier. There is no sense from this at all.
3. Don't try to "bond" the door reinforcement and the base metal of the door. At best, you will get a useless hemorrhagic. At worst, rotting metal. Because rolling without "air bags" simply will not work.
4. Use a building hair dryer to roll even that vibration that does not require heating. This is true if the orifices are very small and great pressure it is not possible to develop the tool on the material. Hot vibration, much more pliable and easier to roll.
5. Use ONLY materials with moisture resistant adhesive as the second layer inside the door. At best, the material will simply peel off and jam the power window. At worst, you may lose your power window altogether.
6. Don't try to seal 100% of the area, it's still not possible. And the difference between the standard sizing, which we will describe below and 100%, you will not even see on the device. On the Internet you can find a bunch of photos on this topic. And believe me, the game here is not worth the candle. It is better to approach this issue technically correctly than to spend days flying by for no reason.
7. Do not try to remove the regular vibration, if it is well kept. At best, it threatens to waste a lot of time for you. At worst, a visit to the paint brush to straighten the dent.
8. Use as an additional tool "blades" for disassembling the interior, open-end wrenches, etc. This will allow you, when rolling the material, to develop a lot of pressure on the material. It is fair if you can’t crawl with a standard tool (roller).
9. Immediately cut out the "mirror" material for the other door. This will greatly speed up the process.
10. And perhaps most importantly. Everyone's favorite saying. IF YOU WANT TO DO IT WELL, DO IT YOURSELF. In this case, it doesn't work. We can give a bunch of examples when such smart people came with dismantled doors to complete the work. And when there are more shields on the doors, the probability of getting into trouble with the lift cables increases hundreds of times. If you are not confident in your directness. Do not be stingy, leave this work to professionals. Heroes do not need to build from themselves. This usually does not lead to anything good. It's better to watch nearby when they do it in the studio.
In front of us, a completely ordinary door.
There are 3 main points here!
Moment 1 (red arrow up).Upper door reinforcement. Don't try to roll it up. It will come in handy when the second layer is mounted. Better, step back from it about 1cm. will be much more useful.
Moment 2 (red arrow down).The same applies to the amplifier, do not try to climb it. Leaving a small gap is the best solution.

Moment 3. At the edges of the doors, also leave a gap. Usually, doors narrow to the edges, and it is extremely problematic to crawl there with a tool. the same applies to the part of the doors that is closer to the hinges. There are already guides for lifts, harnesses and additional amplifiers. Don't try to get in there. Trust me, you don't need it.
Moment 4. At the very bottom of the door, you should not go down. Usually, in these places there is a lot of anticorrosive. It is enough to retreat from the bottom 3-5 cm. And the access there is good, and the anticorrosive agent is in place, and the risk of adjusting is less.

So, for example, we cut pieces with which we will glue the inside of the doors. If with the upper part (on top of the amplifier) it is more or less clear how to do it, then under the amplifier, they are often afraid to glue. We are talking about profiles (with pipes easier).
And everything is quite simple. Cut out the desired piece. Stick through the door and glue the top of the vibra to the amplifier. Moreover, in such a way that the vibration does not enter the amplifier by more than 1 cm. Lightly press the material. The bottom of the material, let it just hang in the air for now.

Then, press the bottom of the material to the metal

And now, peel off the part that was on the amplifier, and glue the material from the bottom up! turning the vibration just under the amplifier. Thus, you get an even, beautiful and easy-to-roll piece.

Well, with vibra — this is perhaps the easiest. With unhurried work and adequate understanding, you will get a completely beautiful, and most importantly, effective door.

Now the second layer. I repeat that a prerequisite is that it will be a material with moisture-resistant glue.
In fact, everything is the same as with vibra. Only a little easier. (You don’t have to roll it out).
Advice: To cut out the most correct piece, count the squares on the vibration (at least approximately). On StP materials, each square is 5 cm on any side. Then you will get almost the exact dimensions of the piece to be cut.
Tip 2: Do not try to shove a whole sheet of Shumkov into the door. This is far from always possible. It is better to cut it into several relatively small pieces. it will be much more convenient. Plus, there is less chance of spoiling the material. The main condition is to mount the sheets as tightly as possible to each other, in order to obtain as few gaps as possible.
As a matter of fact, having cut out the pieces, from above, slip the material as tightly as possible under the upper amplifier. This will ensure that water drains properly through the seals on the door. And if the amplifier does not have obvious protrusions (which will allow you to hide the end inside), then simply mount the material exactly at the end.

At the bottom of the door, we proceed in the same way as with the vibration. glue the top of the material on the amplifier

We press the lower part to the vibration and smooth the material from the bottom up!

Important! Do not try the same second layer, climb into hard-to-reach places. Efficiency will not increase, and you will save your nerves.
So we get something like this version of the door

Now we collect back the door. Here it is worth noting a few things.
1.
Rolling metal with a vibra is worth it when it is very "liquid" or sonorous. In another case, this is essentially not required (purely our IMHO).
2.
It is recommended to close technical openings in any case. Because in fact, you close a hefty "hollow", where all the noise from the doors to the salon will go.
3.
If you plan to change the standard speakers later, the technical holes should be covered with more rigid materials. For example Bomb or Visomat. For regular systems, the standard Aero is enough.
4.
To hide the wiring under a layer of soft sound insulator or not, it's up to you to decide.

Now it's time for the soft material on the outside of the door.
it is better to use the amount of material in this case is: 1 door - 1 sheet. To engage in kusotnichestvo is a very thankless task. It is harder, and there will be no tangible savings.
We tear off the protective film from the material. Yes, from the whole sheet. (you can call a friend). Why completely? because in most cases, it is a film. And the film tends to tear. So, if you tear off a little of the film first, and then try to remove it when the material is glued on top. Either the film can tear, and then catching the remnants on the material when it is glued, then it’s still a pleasure ... And we apply the material to the door. Do not press under any circumstances. Otherwise it's all wasted...

Now, starting from any upper corner, glue the material into the end of the seal. This is necessary so that the sheathing does not bend against the metal of the door. You can, of course, not straight into a tight one, but you must close the bend.


Now, it's time to cut out a place for the speaker. Not too tight, press the material onto the speaker basket. Feel the edge of the basket, and carefully cut the material exactly along the edge of the basket.
Then, sink the material into the base and admire the nice cutout. Which, by the way, compensates for the not very tight fit of the speaker to the door.

Now it's time to cut all the material along the contour of the door. It's a pretty delicate process.
Advice: During the initial disassembly of the door, pay attention to how the skin adjoins the door. Usually, the skin is attached to some "elevations" that are stamped into the door profile. By looking carefully, you can easily understand how to cut future material.
Here we need a very sharp blade. After attaching the material, make an incision somewhere on top. Feel the thickness of the material with the blade, as well as the force required to cut.
Then, barely pressing on the blade, draw it over the entire area of the material, thereby forming a cutting line. Next, draw the blade along the same line again, pressing a little harder. You should have cut through about 2/3 of the thickness of the material. All. It turned out) The rest, just tear off. This cut is enough for the material to come off exactly along the line that was cut.

You will get something like this. And it will be cut to the maximum, and the paintwork will not suffer.

Now, the turn of the clips. AT modern cars, seats are made on small "podiums". Just after cutting and gluing the door, these places will be well molded and visible.
Having found these places, we simply cut out a circle, the diameter of which is slightly larger than the outer diameter of the clip.

Now let's move on to the door trim. And here, too, there are a lot of nuances!
Important note!
We follow this sequence of actions. This is due to the following:
1. It takes a lot less time
2. It's more convenient
3. More efficient distribution of the forces of the master
4. More efficient use of materials.
This sequence has been tested on hundreds of doors and continues to be used to this day.
Well, let's start.
Because Lifehack example is built on the base Skoda Octavia A7 RS, it is worth noting that the skins in the Octavia (on the inside) are not plastic. Something like compressed synthetic felt.

Vibration does not stick to it. Yes, and it is not required. Skins on Skoda rarely resonate. Therefore, we will not focus on this.
Let's move on to the second layer. In our case, it is the only one.
In our understanding, SHVI is some kind of art. It should be both effective and beautiful. Why make it ugly? That's right, no need. And when it also fulfills its function by 300%, then we are going in the right direction.
We take the StP BiPlast Premium 20mm sheet as a basis.
Expand the sheet. Laying on the upholstery

Important: in no case do not press the material. It will be almost impossible to peel it off without violating the integrity of the material. They just put it in and that's it.
We bend the upper part (the place where the skin enters the "velvet" glass ").

And we lay the material to the maximum in the bend. But the upper part near the edge, until we glue it. We will continue to work with her.

We got this look. Some material sticks out from the top. Now we will fix it.
We arrange the skin so that the piece to be cut is closer to us. The rest of the skin should look away from us.
Let's get spicy! blade. We arrange it so that the main blade of the blade is adjacent to the skin. And we start cutting. In this case, the blade should be directed when cutting PUSH! It is important. Never back and forth. Only forward. Moved the blade and a new one. Only forward!
Important: The cutter of the blade is wedge-shaped. Therefore, if you firmly attach the blade to the sheathing, then when cutting the material, you will not cut the sheathing and do not harm yourself.
Important: The blade when cutting, it is worth leading From yourself! because when cutting on yourself, part of the material (thin layer) will go under the blade. And this, in turn, will lead to the fact that the blade will walk in different directions due to a loose fit. When the blade is directed away from itself, the blades will additionally pull the cut edge of the material along with it, which subsequently forms a "side" which is very convenient to use as an anti-creak layer (if the cut is on the side of the skin).

After trimming, we tear off the material from the side and put it all the way into the bend. It turns out such a beautiful bend of the material, which carries a huge function. Just this material will fill the void between the upper bend of the door and the skin itself.
If the space is too large, you can use an additional strip of the same material left over from the cut.

The next step is to lay out all the bends, recesses, etc. around the perimeter of the entire sheathing.
Important: do not pull the material. Yes, these materials stretch well. But it will be much better and more convenient if you tear off the material and carefully lay it along the bends.

It's clip time. Ooooh, this is where a lot of people have a problem. And everything is much simpler, gentlemen)
We tear off the material near the clip
Lay the same material around the clips. Everything is simple.
Step 1. Feel for the top of the clip.
Step2. We make an incision exactly in the middle of the clip. The slit is slightly longer than the clip itself. For example, if the clip is about 1 cm in diameter, then an incision about 1.5 cm long is enough.
Step3. We expose the clip through the slot.
Step4. "wrap" the material around the clip.

We already have a very pretty skin. But this is still a semi-finished product. let's bring it to the final product.

Now cut out the material for the speaker. You can of course just cut a hole. But this is not beautiful, and if you go deep, it is not effective.
We combine beauty and efficiency in the following way.
Almost every "grill" under the speaker has a small side. Some have it big. Sometimes it happens that there is no side at all, then the holes cannot be avoided =))
We feel this side with our fingers

We cut a hole (after all, you can’t get away from it =)) with a diameter Less than the diameter of the side by about 1 cm.

And just lay the material overboard. At the same time, in this place, the material is stretched in a circle. What does this give us? And this gives us a good fixation of the material, so that it does not get on the midbass cone and does not make unnecessary sounds later. Yes, and how beautiful, well, you must agree)
P.S. At this stage, you can cut out the material for the lock rods, wiring, etc.
It turns out something like this.

Well, the matter remains small. Trim our trim around the perimeter.
There are 3 options here. We will describe all 3 options at a time. You just need to use what you need. All 3 options relate to the "profile" of the skin.
Option 1. About The lining has a thick profile, which has a large area of contact with the door.
Option 2. The casing has a thin profile, and has a small area of contact with the door.
Option 3. A combination of options 1 and 2. For example, if the skin is made of 2 different materials, etc.
In our case, we use Option #3.
The upper part of the skin is sheathed in leather and has a thin profile. The rest of the skin has a thick plastic profile.
With a thin skin profile, we do exactly the same as we did at the very beginning with the top of the skin. Everything is exactly the same here, only we do not wrap the material later, but leave it as it is in place.
We also tear off the material a little, cut it off.

And we get to the thick profile

To make a neat cut, we also need a very sharp blade!
We need to make something like "guides" out of our fingers. it is done simply.
We take the blade and pinch it in the pads of the thumb and middle fingers. Moreover, in such a way that the blade is located in the middle of the pads. The rest of the thumb and middle finger should "hug" the same profile of the door card. We get, as it were, sort of "rails" along which the blade will then go.
In this case, the blade should be approximately 45 degrees relative to the cut surface.

Now place the index finger on top of the blade. This will create the necessary pressure on the cutter, which will make a neat cut very easily and quickly.

Now that we have the blade fixed, we simply swipe from start to finish. Choose the pressure on the blade empirically. Usually, with sharp blades, a lot of pressure is not needed.
The blade, due to the fact that we “hugged” the end of the skin with our fingers, goes like it is on rails. Right down the middle for a perfect cut

As a matter of fact, we get such a nice skin that not only pleases the eye, but also carries maximum efficiency!

If everyone is interested in how the door trim is processed with the first layer, then we attach a photo. Processed mainly pockets, places near the speakers and other planes that are clearly subject to resonation.

Need soundproofing?
Contact ourCertified installation center
How to soundproof your car
How to glue the car with sound insulation yourself is an urgent issue for any owner, regardless of the model and brand of the car, in recent years they have been saving on sound insulation, so it is either very weak or completely absent.
The process is not at all complicated, but everyone wants to save money, so it’s only important to know from what you can make soundproofing in a car, to have the right tools and read our recommendations and advice, and after that you will cope no worse than the masters of this business.
Rookie Mistakes
The most common mistakes motorists make when soundproofing.
With the choice of the contractor
A mistake when choosing a workshop threatens with poor quality work, a banal loss of money and, as a result, a lack of sound insulation effect, and the most unpleasant thing, in this case, is that you conclude that it does not give any effect
Your presence in the room masters are working on your car
As a rule, masters do not like it when clients constantly poke their nose into their work:
- This is the opinion of most of the masters with whom I personally know.
- When someone constantly stands over your soul and looks under your hands in the process of work, even you can be expected to react very hostilely
- Almost no one likes it when someone constantly asks “will everything be ready soon?”, Gets underfoot, just gets in the way, or starts to give advice, pester with questions, all this distracts, creates an atmosphere of nervousness, respectively, such behavior, as a rule, does not affect the outcome in the best way.
Haste and no plan
When you get really excited about soundproofing and want to do it immediately:
- Starting work without planning will be fraught with a huge loss of time and, of course, money.
- You may have to go several times for a tool that will be missed
- It may happen that you have to redo the work
- Once glued and then torn off, sound insulation is no longer suitable for reuse - again a waste of money
- In addition, the process of soundproofing is a matter that requires a lot of time and effort, so you should take into account the time and effort (you won’t be able to do it in an hour or two), here you will have to be patient, persevering and diligent, especially if you are a beginner
Wrong choice of materials
This is one of the most common and annoying mistakes, from not knowing how to properly soundproof a car:
- As a rule, good, and even more so high-quality materials always cost good money.
- Here, the habit of saving easily leads to new expenses.
- Not only will they begin to peel off prematurely, which leads to corrosion of the case, the effect of such will be weak, and you can again argue that the noise isolation does not work
- In addition, low-quality materials can be harmful to health, they will poison the air with fumes while in the cabin, and you and passengers will breathe
Error with the choice of sound insulation level
When at first you decide that it is enough just to isolate the car to a minimum, then it will seem to you that it was necessary to do better, more expensive, thicker, but this, as a rule, is a problem of very economical people and perfectionists
Error with the choice of work location
The Internet is full of descriptions and photos of the do-it-yourself soundproofing process, which are carried out anywhere:
- Right on the street, near the office, on the side of the road, etc.
- Here the problem will be the fact that in the wrong place where you will do your soundproofing, you will either be extremely uncomfortable, the onset of night will catch you at the most inopportune moment
- And the most unpleasant thing is that in this case they will certainly steal something from you, right from under your hands, you can lose not only tools, but also interior elements, mobile, radio, DVR, etc.
Using the wrong tools
Let's figure out how to make soundproofing in a car, if all the work is done with just a screwdriver - and disassemble the car and roll in vibration isolation, then it will be at least difficult, although it seems to be real:
- However, if you want to do a quality job (so that something doesn’t fall off later), disassemble / assemble the machine without any problems, then you will need the appropriate tools
Self-doubt
- to block out external noise, and to improve the sound quality of music
- From my own experience, I’ll say that even the most primitive “shumka” of doors gives a wonderful effect, in the cabin the music starts to play noticeably better
- With a minimum door sizing program, you will need only one vibration-proof material, vibroplast vibroplast "silver" or "gold" You need to glue from the inside of the door directly opposite the column
- It is important to glue the largest area with vibration-proof material, the quality of insulation depends on it
- Here, too, it is better to take into account the weight of the material, if the doors are excessively weighted, then over time it will sag and you will have to replace the hinges
- If you have a powerful audio system and you want to improve its sound, then you can’t get off with minimal sizing.
- An integrated approach and at least four layers are required (photo below)
- The first layer is glued on the inside of the doors, where the material is glued through special holes
- You can again use a vibroplast of the silver class, (or bimast bombs) behind the speaker
- And with the second layer - on top of the vibration-isolating material, lay 4 mm splenitis (or Accent)
- Next, soundproof the doors from the outside.
- In this option, it is necessary to completely seal all the technological holes, and make the volume of the door practically airtight, in which the speaker will play
- However, it should be left open. drainage holes so that condensation does not accumulate in the doors
- Outside, glue with vibroplast of the silver class and over it with an accent or splenitis
- The next step is to soundproof the door cards so that they do not make squeaks and other unnecessary sounds.
- Here you will need the anti-creak material "Bitoplast"
- In this zone, the thicker the layer, the better.
- We perform “crickets” inside the doors and pasting rods and handles with the help of madeleine - this is an anti-creak
- The rear doors are treated the same as the front.
- If they do not have speakers, then we reduce the number of layers and choose the type of material thinner
Let's go to the roof
So:
- We make soundproofing of the roof to reduce external noise from rain, eliminate its vibration, and to remove "crickets":
- You already understood how to glue a car with soundproofing
- After sizing the ceiling, the effect in the rain is simply amazing - even in heavy rain, only muffled blows do not remain inside the cabin, which are almost imperceptible and do not cause discomfort
- Here you can use vibroplast silver, weight is important, the higher the weight of the roof, the more the center of gravity will shift, we recommend using an accent of 4 or 8 millimeters, even in two layers
- The possibilities are limited so that it is possible to install the ceiling sheathing in place without interference
car bottom
Soundproofing the bottom is done to reduce noise from pavement, and from blows from pebbles on the bottom of the car:
- Here you can use the best vibration absorbers and good layers, overlap, just do not glue the fasteners, otherwise there will be problems when assembling the interior
- Top again Accent, better small thickness, but in two layers, here the wider the coverage area, the better the effect
- Close attention should be paid to the places of the wheel arches inside the cabin, it is better to glue them thicker (in two or three layers), use “bimast bombs” as a vibration isolator, in its absence vibroplast gold
Trunk and wheel arches
There are a lot of noises and squeaks in the trunk area, so you should not miss it:
- Particular attention should be paid to the niche of the spare wheel, if possible, it should be completely pasted over with anti-vibration material.
- Second layer sound absorber Accent
- Glue all trims in the trunk with Bitoplast anti-squeak material
- Soundproofing wheel arches is necessary to increase comfort in the cabin
Instructions for actions when soundproofing wheel arches from the outside:
- Take off the wheels
- Remove the plastic fenders (you can’t throw them away, they serve as good sound insulators)
- Then you clean it from dirt and glue vibration-insulating material on the surface of the arch, preferably “gold class vibroplast”
- Ideally, use “liquid” noise insulation of the “Noxidol” type, it is easier to apply and works better, and the weight is less and excellent anti-corrosion protection, along with the arches, you can also process the bottom from the outside
- If you do a good job, then the impact of the pebbles should not be heard at all.
- Construction Shumka is used, as a rule, outside the premises, so inside the cabin it can be toxic, it can burn or melt in the engine compartment, and the effect of it may not justify hopes
- Felt, even acoustic, in the car is suitable with big stretch, because it absorbs moisture by itself, pulls it out of the air, so the car body will begin to rust quickly, then felt is by no means a cheap pleasure
- To use felt in a car, it should be sealed in polyethylene
- We are not talking about the use of other "alternative" materials at all.
This is how all fender liner are soundproofed
What can replace the sound insulation in the car?
An excellent question, you just have to ask it to local "craftsmen" and you will be given a bunch of advice from building sound insulation to linoleum with felt:
I have everything, in addition, watch the video for your specific model.
AT expensive cars good sound insulation was taken care of at the factory at the design stages. However, with inexpensive brands, the situation is often different. Noise isolation, which is installed in them, is not always able to get rid of unnecessary sounds. Protection is either completely absent, or minimal work has been done on it, respectively, comfort when driving on such vehicles is reduced to zero. The noise of the external environment, annoying the driver, pushes him to make soundproofing on his own.
Vibration isolation material
The first and main raw material of sound insulation. It is produced in plates of certain sizes. Vibration isolators are bituminous, mastic or bitumen-mastic, with or without foil in the composition. The thickness is chosen based on the completeness of the car body.
Vibration isolation material Bimast Bomb
- Combined and bituminous slabs require heating during installation - efficiency from this isolation will become better. This type of vibration isolator is applied to places loaded with vibration - front and rear wheel arches, bottom, engine compartment, while the places of application must be well cleaned of dirt and dust.
- Mastic based materials , on the contrary, do not require heating before their application. They are laid in place inside the car: the floor of the trunk, under the rear seats, roof, hood and on the car door.
- Vibration isolators, which includes foil , the most convenient when in operation.
Heat and sound insulating material
Self-adhesive foam material. Copes not only with extraneous noise, but also insulates the interior.

Heat and sound insulating material Splen
- During operation, it is usually glued over the vibration isolator .
- Does not require preheating.
- Heat and sound insulating materials include: Splen, Flex, Barrier.
The advantage of heat and sound insulation is that it does not absorb moisture, but the glue is not resistant to water, so the places for its application are limited.
soundproofing material
The heaviest and most efficient material, absorbing up to 95% of noise, and featuring an open cell structure.

Soundproofing material Isoflex
The most common models: Isoflex, Bitoplast and Accent.
NoiseBlock models are available, which are self-adhesive and are applied as a third layer on low density foamed soundproofing material (eg Splen or Barrier). Part of the noise that still passes through the soundproofing layers is reflected from the NoiseBlock and muffled. Thus, maximum efficiency is achieved.
Anti-creak material (anti-creak)
Self-adhesive material made of fabric, which is glued to the places where the parts of the machine come into contact. Thus, the parts in the process of work do not create mutual friction, and, accordingly, do not creak.

Anti-skrip for the car. Also available in ribbon form.
- Effectively eliminates squeaks, beats, sounds.
- During the application of soundproofing, heating is not required.
- Minus antiskripa in a relatively meager assortment.
Good demand among buyers are: Madeleine and Biplast.
Liquid soundproofing material
This is a modern way to isolate a car. It is, in fact, liquid rubber with a complex of additives. It is used for external noise protection and for anti-corrosion treatment of the body.

Liquid noise insulation for a car and method of its application
- Liquid insulation does not absorb moisture. In other words, her can be used in places where the car comes into direct contact with water (for example, on the bottom or wheel arches).
- Liquid mastic is resistant to reagents and mechanical stress.
- Before application, the surface must be cleaned of dirt and degreased. Liquid mastic must be applied to the cleaned metal. Some types can be applied without first treating the car with a primer.
- It is applied in two ways: aerosol coating and painting (brush or roller). If you need insulation from the outside, the spray will be the best solution.
- Unlike other materials, liquid noise insulation does not increase the weight of the car, and absorbs noise well.
- The price is high, but the service life is not small - 5 years.
During the purchase of products, be sure to ask about the documents on quality assurance and compliance with sanitary and hygienic standards. These documents prove high quality and harmlessness to health.

car soundproofing price
Noise protection is now offered in many places: in private garages or in official car dealerships. Some eliminate the noise on their own. This also depends on the cost.
When deciding to make soundproofing with your own hands, you can use a ready-made kit. It consists of a certain set of materials, a scheme vehicle, which shows the places where it is worth gluing the kit.
Average price of finished kits per model:
- Class B - from 11,000 to 21,000;
- Class C - from 11,000 to 21,000;
- Class D - from 14,000 to 27,000;
- Crossovers - from 15,000 to 26,000.
The average price for soundproofing the doors and interior of a passenger car with your own hands without the use of special kits will cost 6,000 - 8,000 rubles.
Professional services will cost significantly more. The price depends on the quality of raw materials, rent (if the premises are rented) and payment to employees. The average cost of soundproofing an entire middle-class car in all regions is approximately 30,000 to 40,000 rubles.
Usually the first thing they do is soundproof the doors. Drivers who have installed insulation note a noticeable damping of the sounds of the external environment and high-quality sound of music. Work should be carried out in rooms where the temperature is more than + 15 °. In cold weather, at the beginning of work, it is worth opening all the doors and letting the car warm up in the warmth.
Attention!
Do not disassemble cold plastic - this will lead to its breakage.
Before isolation, prepare the following tools:
- Screwdrivers;
- Stitching roller;
- Blades for engaging clips and sheathing;
- Knife for cutting metal;
- Clean rags;
- Degreaser;
- Building hair dryer.
To begin with, we remove the door trim from the door and remove the film from moisture (often this is standard polyethylene). After we clean and degrease the door.

Before carrying out work on soundproofing car doors, it is necessary to remove the entire trim
It is better to start work with a door shield. It is important to pay attention to the old vibration isolation - if there is damage or deformation, it should be thrown away. We also remove the factory anti-corrosion coating.

Ways to install soundproofing on car doors
Now let's deal with the vibration isolation of the doors. It is not necessary to stick soundproofing on the entire door, the main thing is to paste over a large number of sections.

To achieve maximum sound insulation quality, it is enough to cover 70-80% of the surface
Door stiffeners do not need to be glued. It will not get worse, and the material will be wasted.
2 mm of vibration isolation is enough for the door, since the thickness of the door metal is small. To make the material last for a long time, if possible, smooth it with a roller. If the room temperature is low, the vibration isolation should first be warmed up with a building hair dryer to + 17 °.
We install soundproofing on vibration isolation. The insulation is self-adhesive, but it is still worth ironing after installation. You do not need to pay attention to the fact that it will not be possible to glue a solid sheet of sound insulation, it is almost impossible to install it there whole. The main task is to do everything neatly and cover all open surfaces.

Applying soundproofing to the inside of the door
Then again we work with vibration isolation. In order to be good effect, technological holes should be closed. Ultimately, the surface of the door should look like closed areas.

The third step is anti-creak processing. Wrap wires and rods with 5 mm anti-creak. Places of skin borders, removable plastic parts and clips are treated with material.

An example of anti-creak door treatment
For an additional effect, vibration isolation can be partially installed on the door skin, and completely glued on top of it with a sound absorber. The difference between them is that the vibration isolator has the ability to retain heat in the cabin, and the sound absorber dissipates sounds. This action will improve music playback and greatly reduce driving noise.
On this we finish the soundproofing of the doors and mount them in their original state.
You can also watch a video on this topic:
Wheel arches are the main and strongest source of sound while driving. While driving, stones, sand, gravel fly off from under the wheels, which hit the wheel arches, causing a rumble. With a quality approach to work, noise can be reduced by 30% - 50%.
The noise level depends on the body type. In sedans, the arches are at the same height as the hood, and the rear arches are at the same height as the trunk. If at the factory for such a car noise reduction was provided in the luggage compartment and for the rear wall of the engine compartment, then in this case extraneous sound from the arches is muffled.

External and internal insulation of wheel arches
The hatchback situation is a little more complicated. Regardless of how well the front end of the car is, rear arches installed at saloon level. That is why the noise inside the cabin becomes higher. There are two ways to solve the situation - turn to professionals or install sound insulation yourself.
Required tools:
- Roulette;
- Construction knife;
- Scissors;
- Textile;
- Building hair dryer;
- roller.
Before purchasing raw materials, you should decide on the territory for installing the sound absorber. The level of insulation depends on the thickness of the material. If too thick sound insulation is used, mounting difficulties may occur. attachments, the distance between the wheel and the arch will decrease, which will lead to friction and, accordingly, additional noise. To do everything right, choose a material with a thickness of 3 mm to 5 mm.
Soundproofing wheel arches from the inside
To begin with, we remove all parts of the car that may interfere with work. For example, the internal soundproofing of the front arches provides for work from engine compartment. No need to remove the engine or other complex parts, but it's worth a little "clear your way."

Wheel arches can be soundproofed from the inside
We clean the arch from dirt, wash it and dry it with a hairdryer. After that, we cut out the desired area (it is desirable to achieve 100% coverage) from the vibration isolation material. We apply self-adhesive insulation to the arches. When using materials based on bitumen, warming up with a hairdryer is required after gluing.
You should not rush, sticking vibration isolation to all places. It is worth starting from one corner, gradually smoothing the material with a roller. At the end of the work, you need to smooth everything again.
During the process, it is important to make sure that there is no free space left under the sheets. Subsequently, due to incomplete coverage, rust may occur.

Application of self-adhesive vibration isolation on the wheel arches from the inside
After installing the vibration isolation with the second layer, we glue the noise isolation (for example, Accent). The process is the same as described above.

Applying soundproofing to the wheel arches from the inside
Soundproofing wheel arches outside
Before starting, we remove the wheel and wheel arch liners, clean the surface of dirt. If metal corrosion is detected, we clean it. We glue on a clean surface of the arch vibration isolation, which includes bitumen. After that, soundproofing can be applied over the first layer. For best result we apply mastic material on a rubber-bitumen base to the joints, and at the end we process the entire area with mastic (or anti-gravel).
After the whole operation, we return the wheel to its place and covered it.
Noise protection of the arch is completed.
Insulating the floor will bring good results in reducing noise, because most of the sounds are transmitted through it to the passenger compartment of the car.
The following tools are required for work:
- Scissors for metal;
- Construction roller;
- Net cloth;
- Screwdrivers;
- Degreaser.
Before work, we remove all the seats, rugs and upholstery - the interior should remain completely empty. It is important to look at the factory felt sound insulation. It should not smell bad, peel off or crumble, but must be completely dry. Otherwise, it should be removed. Next, the entire floor is vacuumed, degreased and covered with anticorrosive.
The first is vibration isolation. Pasting from the motor partition, we lay the material all over the floor in whole sheets. We finish at the lift under the rear seats. We warm the surface with a hairdryer and roll it with a roller. Similarly, we glue the vibration isolation under rear seats.
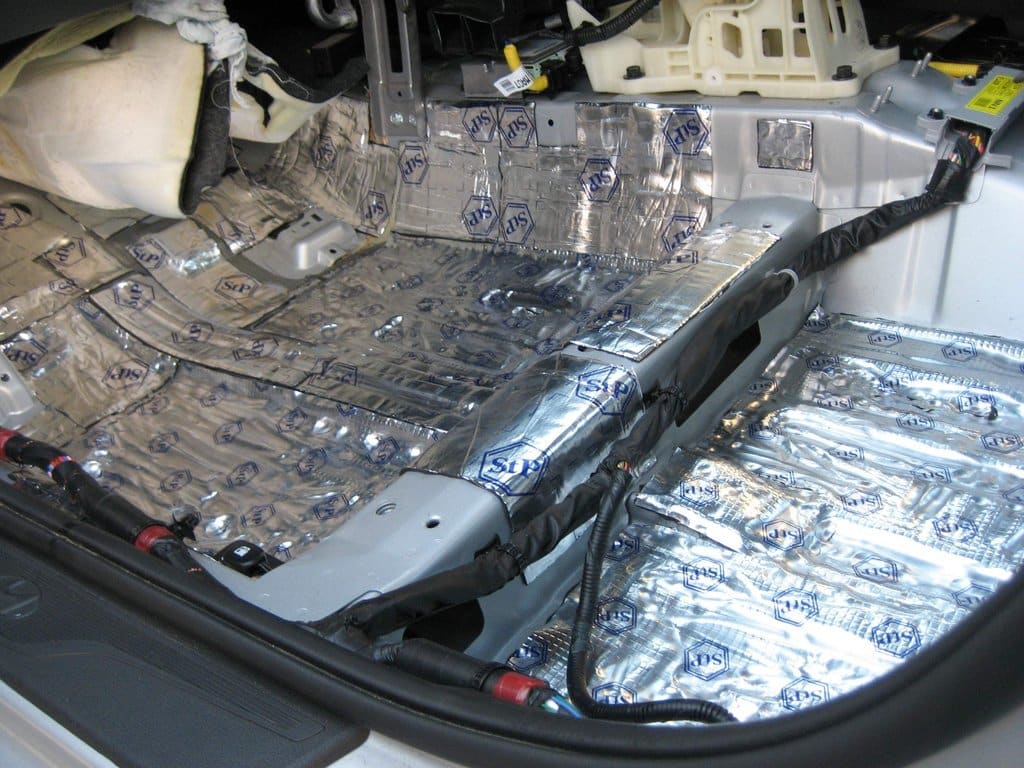
Vibration isolation car flooring
Do not glue the wiring and technical openings.
Attention!
Overlapping can create air between the material and the floor, which can lead to corrosion.
You need to try as best as possible to glue the places of the front arches under the factory soundproofing and at the same time not touch the gas tank hatches. After everything is carefully rolled with a roller.
The second layer is glued soundproofing. We glue from the engine bulkhead to the rise of the rear seats. Using a roller, squeeze the air out from under the fabric. After that, in the same way, we process the area under the rear seats and the gas tank hatches and again iron everything with a roller.

Car floor soundproofing
After all the work, we return all the interior parts to their place. Noise isolation of the floor in the car is over.
Significant amounts of outside noise. It was after car door soundproofing there is a noticeable reduction in external noise. In addition, it is always possible to completely "make noise" of the door with your own hands. There are no supernatural complications here.
Before soundproofing - dismantling the door
The first stage is the complete disassembly of the door, namely, the removal of the outer skin. This stage is the most difficult, but not the most difficult. It is necessary to remember (or rather write down) which screw or screw was in which hole, in order to facilitate the reassembly of the door. The mechanism for opening and closing the door, as well as the power window device, can not be removed, because. putting them back is extremely difficult. These nodes will not interfere with self-soundproofing doors.
The second step is to clean the metal of the door from the factory sound insulation and the door wall closest to outside- from factory anti-corrosion treatment. It is important that the surface is clean and fat-free - White Spirit will help with this. The main thing is not to scratch the paint to avoid corrosion.
Let's start soundproofing the door
Next, the inner side of the door (side to the road) should be pasted over with vibration damping material. Vibroplast Gold is best suited, while trying to seal the maximum area that the technical holes in the door will allow. Crawling there is not very convenient, so in order not to scratch your hands on the sharp edges of the technical holes, it is better to work with cotton gloves. The door reinforcement does not need to be glued. Currently, Aero and AeroPlus from STP are increasingly used for vibration isolation of door metal. They are lighter than Vibroplast Gold, which will positively affect the resource of door hinges. A high ILC will make the door “wooden” for a knock, the doors will close like a car of a higher class with a pleasant “bang” sound instead of “bdzin”. In addition, the new Aero line has an extended temperature range, which is especially important for the cold season.
Opposite the speaker, it is recommended to stick a circle of Bitoplast in order for the speaker to play better and not be affected by sound waves reflected from the door. It is not necessary to paste over the entire surface with Bitoplast, because. this material absorbs moisture, and diluting dampness inside the door is the first step towards corrosion. The second layer on top of the vibration isolation used to be pasted over with Splen for silence, since the usual Accent could not cope with the moisture that appears in the door during rain. In addition, on some cars Splen 8 mm could not withstand the operating conditions and corny peeled off due to non-waterproof glue. A new generation material is now available - Accent Premium, which is not at all afraid of water: the outside of the material is covered with a black film, and with reverse side a moisture-resistant adhesive layer of green color is used. Therefore, the inside of the door can be safely pasted over with a premium Accent.
For music lovers, the use of any material (except for vibration isolation) inside the door is undesirable, because of it unpleasant echoes will begin to appear and the quality of the music will deteriorate.

If the sound quality of acoustics is not important, then the entire inner surface of the door should be sealed with Accent Premium or Splen on a mastic basis. Glue should be as large as possible in pieces, ideally - in one piece. It will become quieter.
Vibration isolation of all door openings
We turn to the inside of the door - closest to the cabin. Two options are possible here.
If the car is being prepared for the installation of powerful acoustics, and a juicy game is expected from the midbass installed in the door, then it is necessary to close the technological hole in the door with a dense and hard material. Depending on the size of the holes, sheet aluminum or dense fiberglass can be used for this, which is then pasted over with a powerful vibration damper, for example, Bimast Bomb Premium or Vizomat. This is important to improve the sound quality of music - something like a hard closed box should come out of the door. At the same time, it is important to check the operability of the door opening mechanism and the power window - so that nothing interferes. The use of Bimast when sealing technological windows can significantly increase the mass of the door, you have to choose: either hinges or music.

If the sound quality of the acoustics is not important, then the technological windows are closed with waterproofing: it is important that moisture does not enter the cabin. STP Aero is suitable for this: lightweight and tear-resistant. It is not worth gluing a lot. Vibration isolation is not worth it. the weight of the door increases and the hinges may not withstand a large load.
There is also a compromise option applicable for soundproofing the doors of civilian vehicles: we cover the technological holes with VIEK STP foil, and then we roll Aero Plus on it. Thus, we obtain sufficient rigidity for medium power acoustics, excellent waterproofing and a small increase in mass.

Then you should paste over this surface of the door with Accent or Accent Premium material, in extreme cases - Bitoplast 10 mm, making the necessary cuts for all mechanisms. An area close to 100% should be glued, leaving space for wires (if a power window is installed) and a speaker.
soundproofing door trim
Finished with the door, let's move on to its trim. It is recommended to glue a few pieces of a vibration damper on the skin surface (STP Aero or Vibroplast Silver is enough) to reduce skin vibrations. Particular attention should be paid to joints in plastic. Then the entire surface of the sheathing is pasted over with Biplast 10K material with a margin of several centimeters along the edges. After cutting the bitoplast along the contour of the skin, it will act as an anti-creak - all knocks of the skin against the door itself will disappear. Another option is also possible: in the places where the door skin is adjacent to the metal of the door, Madeleine strips are glued to the skin along its perimeter, and the inner part of the skin is filled with Biplast.
On this car door soundproofing finished, you can proceed to install the skin back. On the different cars the door is disassembled in different ways, but the principle is the same everywhere. When soundproofing doors, it is better to completely refuse Splen, because. inside the door, only minuses from it (the sound quality of the acoustics deteriorates, it can fall off from moisture), and outside (between the layers of Bitoplast) it can interfere with reassembly.
As a result of the “shumka” of the doors in the car, it will become noticeably quieter, and the doors will close easier due to the increase in mass.