LED interior lighting is more popular today than ever. In the salon of any modern car many different light sources. At a minimum, the cabin has a central light located on the ceiling, as well as a "navigator" light located in front of the ceiling, in front of the windshield. In addition, in the passenger compartment there may be lamps in lamps located in cosmetic mirrors, in the illumination of the glove box (glove box), in lighting the trunk, thresholds, leg area, etc.
For all these lighting fixtures, 95% of cars use two types of lamps:
- baseless lamps marked W5W (or, according to other classifiers, T10)
- soffit lamps marked C5W / C10W (or, according to other classifiers, festoon - festoon)
But even in the two most common types of lamps, it is not surprising to get confused, since our catalog of LED car lamps contains more than 20 models of each type. Let's try to figure out which models of LED lamps are suitable for the interior of your car.
1.2.
3.
4.
Plinth type
Choosing LED lamps for car interior lighting is not difficult. On the main page of our store, select the make and model of your car, then open the "interior lighting" subsection. If you did not find your car in the catalog, or the "interior lighting" subsection for the car model you are interested in is not filled in, then it will not be difficult to choose LED lamps for interior lighting on your own.
The most reliable way to find out the type of bulbs used in your car's lights is to open the shades and remove the stock bulbs. If you see that the lamp is entirely glass with a flat base about a centimeter wide with metal antennae, then you have a W5W baseless lamp:
This small incandescent lamp has a power of 5 watts and a luminous flux of approximately 50 lumens (incandescent lamp characteristics are taken from Osram's automotive lamp catalogue). To replace this obsolete incandescent lamp in all respects, you can choose a modern, brighter and more efficient LED lamp in the section.
If you see a lamp with two metal cones at the ends, then in front of you is a soffit (it is also a double-ended) lamp.

With this lamp, it is important to measure the distance between the extreme points of the socles. If the length of the lamp does not exceed 37 mm, then this is a lamp marked C5W, the power of such an incandescent lamp is 5 watts, and its luminous flux is approximately 45 lm. If the length of the lamp is more than 37 mm, then this is a C10W lamp, its power is 10 watts, and the luminous flux is about 100 lm. On our website, the length of C5W lamps is indicated by the last number in the name of the LED lamp. That is, for example, the F-4s50f31 lamp is 31 mm long, and the F-6s50f42 lamp is 42 mm long. You can select lamps of this type in the section.
If the lamp is a glass body with a cylindrical metal base, then this is a T4W lamp:

The power of such a lamp is 4 watts, the luminous flux is about 35 Lm, you can choose a replacement for it in the section.
The space inside the lamp
After the desired type of lamp is determined, it is necessary to inspect the interior lamp itself. When choosing soffit LED lamps C5W pay attention to the length of the lamp as well as the space inside the saloon lamp. If there is not much space around the standard lamp, as for example in this case:

then it makes sense to choose a narrow lamp.
If there is enough space and a wider LED lamp will fit in the passenger compartment or trunk lamp, then you can put wider and much brighter lamps.
LED lamp bigger size provide uniform light over the entire area of the lamp, good illumination of the entire area of \u200b\u200bthe diffuser, that is, they solve the well-known problem of the "light point".

The luminaire in which it is installed baseless LED lamp W5W may be of various shapes and sizes. The first thing you need to pay attention to is the location of the lamp inside the lamp. If the lamp inside the ceiling is parallel to the plane of the diffuser, i.e. in other words, sideways, as in these photos:


It is better to stay on LED side-glow lamps, for example:
In this case, the entire luminous flux of the lamp will be directed in the right direction, and not illuminate the walls of the interior lamp in vain, as in this photo ...

In addition, it is important here to evaluate the space inside the luminaire and, if possible, choose a larger LED lamp for better illumination of the entire diffuser. A good example of choosing bright LED lamps for interior lighting:

In the case when the lamp in the luminaire is located perpendicular to the surface of the diffuser, and the space inside it is very limited, as, for example, in this salon luminaire:

And if there is enough space in the interior lamp, then there is a choice: put small LED lamps more or less standard size, as shown above, or put in larger, slightly unusual LED lamps like these:
with high brightness and giving a great effect of bright, diffused light.

Lamp brightness and color
In addition to the external shape and size of the LED lamp, it is necessary to take into account its purpose, that is, where exactly the LED lamp will be installed and what it should illuminate.
Lamps "navigator" light designed for reading in the cabin, for example, a road map. This means that the light in them should be enough for reading, but at the same time, the light should not be excessive so as not to blind the eyes. For reading, it is better to choose a white or natural white color of the glow. The optimal indicator of the luminous flux in this case is 100-150 Lm.
The central interior light creates general lighting inside the car. It is logical to put a white LED lamp in it with a maximum luminous flux so that there are no dark corners in the cabin. But if you are not a fan of classic solutions, then you can put colored LED lamps, for example, or and make yourself blue, red, green or even pink light in the cabin, which looks very unusual.


The light in the cosmetic mirrors located in the sun visors should not be too bright, because during the use of the mirror the lamp will shine directly into the eyes. Comfortable luminous flux in this case is 25-70 Lm. At the same time, the lamps should illuminate the face well, which means that the light should be pure white.
Lighting of the leg area, glove box and trunk should be such that not a single detail is lost in the depths of the car. Here you can not skimp on the light and put in these, usually small lamps, the brightest LED lamps:
The bright light of such LED lamps will be especially useful when searching for a dropped phone or lipstick in the glove compartment.
LED illumination of doors or thresholds performs two important features. Firstly, it illuminates the space in front of you when you get out of the car, and secondly, it indicates in the dark open door making it more visible to other road users. In the lamps located in the doors, you can install LED lamps of any color and brightness, to your taste.


Ready-made lamp sets
As you can see, when choosing LED lamps for the salon on your own, it is necessary to take into account many nuances. If you don't want to be bogged down with lumen output, markings and lamp configurations, then choose one of our over 100 pre-made LED lamp kits, custom made for a specific vehicle model.
The lamps in this set exactly repeat the interior space of the interior and trunk lamps of this car, flood the lamp diffusers with light as evenly as possible, and in addition, they have light dimmers and a lifetime warranty! You can choose a set for lighting the interior of your car in the section.
Among the ways to distinguish a car from the mass of the same and make it more spectacular, a special place is occupied by the interior lighting of the car. Modernization of this kind is ideal for both foreign and domestic cars. Which of the lighting tools is better and how to do the tuning yourself?
1 Choose the backlight for the car interior
What is interior lighting? Devices can be turned on when the doors are opened or controlled by the driver using a special remote control. But the most the best option It's a combination of instruments. If we do the job wisely, we will get neon floor lighting that turns on when the door is opened and diode lighting for the rest of the cabin, powered by a switching unit.
In the domestic market, there are 2 options for upgrading the car interior lighting. The first is the purchase and installation of an LED strip. The main advantage of diode backlighting is the ease of installation with your own hands. In addition, it does not require special fasteners, and for installation it is enough to glue the tape that comes with the kit. The standard LED lamp has a very small size, so it can be mounted anywhere. It is ideal for illuminating the cigarette lighter and other small parts of the car interior. Another plus of the diode tape is its excellent impact resistance and tightness. Due to this, its service life is much longer than that of other lighting devices. The LED strip lights up instantly, which makes it possible to use it to achieve various lighting effects.

You can also make neon interior lighting with your own hands. It is characterized by a very bright light, which allows you to illuminate a large space. But neon lamps are quite difficult to install and capricious in operation. In addition, neon lighting often burns out with frequent on-off and practically does not endure the slightest mechanical damage.
2 Installation of neon lighting in the car interior
As we mentioned above, it is best to do a combined interior lighting. Next, consider the installation of neon lamps and diode lighting with your own hands.
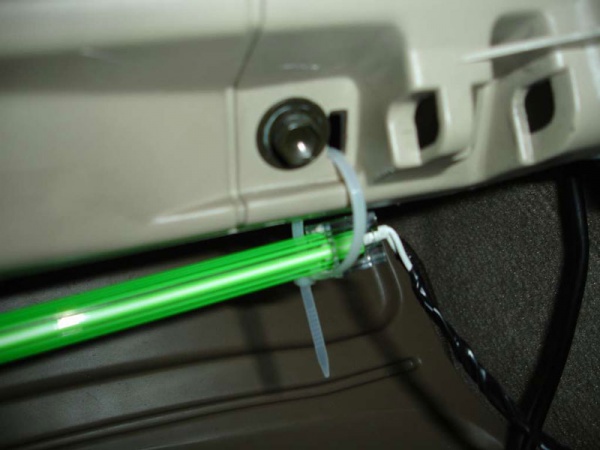
It is best to start with the installation of neon lights, which should be located in the lower part of the car's interior. For work we need:
- nylon clamps;
- corner made of durable aluminum;
- neon lamps;
- self-tapping kit.

Most neon lights have cigarette lighter sockets. We do not need it, so we need to cut off this part and carefully clean the ends. Next, you will need to saw off the corner so that its size matches the size of the lamp, and then screw the lamp under the interior dashboard. After that, we fasten the lamp to the corner using nylon clamps. Thus, the space under the driver's feet will be highlighted.
The same operation must be done wherever you would like to illuminate the interior space. One caveat - in the area rear seats the corner must be screwed with an edge upwards in order to at least slightly protect the element from damage.
All available wires must be carefully placed under the mats and stretched to the dashboard near the driver's seat. Connection points must be carefully insulated. Next, connect the wires to the door open sensor and to the interior light switch. Also, the wires of neon lamps can be connected to the battery. Before this, you need to remove the wipers, and at the end of the work you can return to the place.

One of the LED backlight wires should be connected to. This device will notify you of the presence of the installed lighting every time you reflash the engine ECU of the car. So the neon lights will remain intact and will not burn out during the chip tuning process.
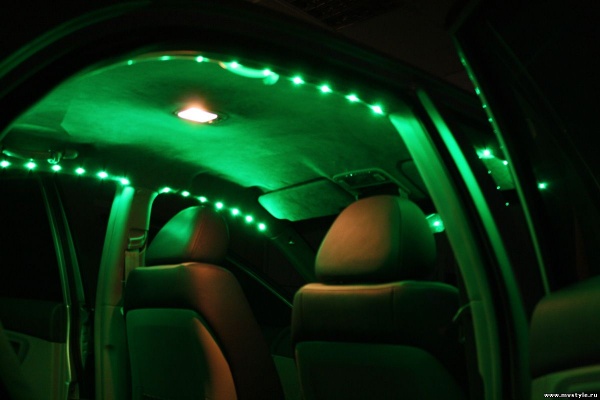
Now when you open the door, neon lights will work. The resulting effect will amaze not only you, but also passers-by.
3 Installation of LED strips
Mount the diode backlight with your own hands according to the standard scheme. We will need a set of wires, heat shrink tubing and LED strip.
Both individual diodes and LED strip can be bought at any auto shop. Best to buy factory model tapes, since the meter version will have to be finalized.

Start work from the dashboard of the car. It is necessary to pull out all the standard shield lighting devices, and then install diodes in their places. They have the same bases as standard lamps, so there will be no problems with installation.
Next, you need to determine the optimal location of the diode backlight. In most cases, it is installed around the entire perimeter of the ceiling parallel to the pillars of the car body. We apply the LED strip in the same way and measure the desired length. The rest can be cut off. The places for cutting are easy to determine even for a beginner, as they are marked on the tape with special membranes. After cutting, you need to clean the ends and solder the parts of the LED strip to each other. It is necessary to put bushings on the joints and warm them up with an ordinary household hair dryer.

You need to connect the diode backlight we received in the same way as neon lamps. Be careful not to reverse the polarities. They are indicated on the tapes in the places of cutting.
As we have seen, upgrading the interior lighting of a car does not take much time and does not require special skills. The only caveat is that you need to be careful and work without haste.
In evening time LED lights the cabin becomes an analogue of the air conditioner included on a hot day. Not all car owners are satisfied with the classic backlight, often there is a desire to make changes to it. The best option to solve this problem is a do-it-yourself LED car interior lighting.
Let's try to figure out how to make relaxing and comfortable lighting inside the car, giving the interior a uniqueness and individuality. With a similar task, interior lighting with an LED strip, made on its own, will cope. Modern LEDs are able to make a dramatic transformation in the appearance of the cabin in a matter of minutes. Currently, manufacturers offer various options for color combinations, glow saturation - the choice is up to the consumer.
Illumination in the car interior
Let's start with the fact that LED lighting in the car interior has distinctive characteristics:
- ease of installation of the backlight;
- when installing emitters, there is no need to mount mounting devices. The backlight must be mounted on a special surface with a sticky base. In order to strengthen the LED strip inside the car, it is enough to get rid of the protective strip;
- small LEDs can be easily put into standard sockets, having previously removed typical lamps from there;
- The LED lamp has high mechanical strength, it is sealed. If the polarity is not reversed during installation, it is quite difficult to disable the lamp;
- the LED lamp lights up instantly, you can use light bulbs for light music.
The specificity of neon lighting
Neon lamps give a rich and bright light. Mounting them is more difficult than installing LED bulbs. In addition, during the operation of neon lighting, problems often arise. For example, such lighting is not designed to be permanently switched on and off. Lamps will need to be changed frequently.
How to make an original backlight in a car with your own hands?
As soon as you choose the option of lighting the car interior, proceed to the selection of tools and materials, without which you cannot realize your plan.
You will need:

Instruction
Do-it-yourself LED interior lighting is performed according to a certain algorithm:
- First you need to remove the terminal from the battery.
- Next, we determine the location of the LED backlight. It can be installed above the torpedo.
Advice! In order for the backlight to be safe in operation and not to be touched by passengers, we suggest fixing it under the seats.

Attention! Try to place the fuse closer to the battery so that you can change it at any time.
- On the electrical wire put on a protective special tube. Solder the wire, then place a protective tube at the soldering point.
- The second wire must be brought to the case, connected to the battery. Using the controller, you can change the color options of the LED backlight, on average, you can use 17 million different shades. The controller helps to choose colors, adjust the intensity of the glow. With the help of an LED strip fixed inside the cabin, it is possible to illuminate the space with five speed options, with changing effects and colors.
- Next, we proceed to the calculation of the length of the wires. You also need to decide on the location of the switch. The location of the fuse near the battery allows you to protect the lamp from power surges, switching errors.
Places for mounting LED lighting
Among the convenient places in which you can mount the LED backlight, we highlight:
- location under the glove box or dashboard;
- installation of LEDs car seats;
- fixing the LED strip under the headrests.
Once the wires are attached to the battery, you can put a fuse for the backlight. You can pass the wire through the holes that are in the plate dividing engine compartment and car showroom. If there is no hole, you can drill it yourself.
Attention! Be sure to put rubber insulation on the edges of the hole, otherwise the wires will break while the machine is moving. For such purposes, a rubber ring of the desired diameter is suitable.
We connect the second wire to the battery terminal, throwing it through the hole in the plate. When connecting, be sure to observe the polarity.
Advice! Make sure that there are no traces of rust, paint, dirt on the wire.
When carrying out self-installation of LED lighting in the cabin, you can significantly save your family budget.
Options for connecting lighting in the cabin
Ready-made lighting is available at many auto parts stores. On average, the basic equipment for interior lighting, consisting of 4 neon emitters, is 2-6 thousand rubles. After installing such a backlight, the car will become “exclusive”, completely transformed and updated.
We mount a multi-color backlight, which will be powered by a car cigarette lighter. Professionals consider this installation option the easiest, since there is no need to change the electrical wiring inside the car. To work, you need to use:
- four-pin RGB LED strip;
- stranded wire (4-5 m);
- controller with control panel;
- soldering iron;
- 4 terminal clamps;
- transparent silicone sealant.
Before proceeding with the installation, it is important to perform high-quality measurements of the places where you plan to mount the LED strip. In addition, it is important to measure the perimeter of the cabin along which the tape will be attached. The distance under the instrument panel is measured. Next, the distance between the front car seats is determined.
Advice! Add 40-50 cm of tape to the received figures as a reserve.
After completing all the measurements, you will have four pieces of LED strip and 7 wire fragments.
Wiring diagram
The tape is attached, then the wire, then the connector, the next wire, the connector again, the wire again, and a new piece of tape. To fasten the individual elements of the circuit into a single whole, an electrical wire is used, which passes between the upper connectors. The terminal clamps of the upper pair are installed under the dashboard, and the lower ones are attached under the front seats.
You can clearly see this in the video:
When buying an LED strip, do not forget that you can only cut it into pieces in some places, using the line that is located between the flat metal contacts. Also, keep in mind that the controller is rated at 12 watts, so calculate the maximum wattage of the lamps on the tape before starting installation. We clean the wire segments of 1 cm from the plastic, solder them to the LED strip, and perform the insulation with silicone glue.
You can fix the tape and wires to the place you need using double-sided tape. Installation should begin from a place under the glove box.
The wires must be passed through the terminal clamp and the controller must be fixed to it. Then you need to check if the wires match the color of the controllers. We complete the installation of the backlight under the car pedals.
Car interior lighting is an integral part of LED tuning. To make the interior of the car brighter, to highlight your car, every driver wishes.
Motorists put cool wheels, low profile tires, interior lighting, dashboard, bottom lighting and so on.
Standard incandescent bulbs are gone, just like neon tubes, at the moment LED lighting dominates, as LEDs have a lifespan of more than 50,000 hours, they do not drain the battery and shine brighter than conventional lamps.
The kits presented in our store are sold ready for installation and do not require installation in the service, it is enough to stick the tapes on double-sided tape (included in the kit) and connect to the cigarette lighter.
Choice of interior lighting.
Typically, motorists choose the color of future lighting to match the color of their car. As the most versatile option - white and blue. White is often supplied with business class cars and above. Blue is often seen in sports cars.
Interior lighting available:
- white,
- blue,
- red,
- green,
- multicolor
LED car lighting is rapidly gaining immense popularity in any country. High-quality, LED interior lighting of the car can make a favorable environment for the driver and passengers. However, do not overdo it, do not forget that a glut of cars with bright colors can distract drivers on the road.
There are 2 main places for installation, under the feet of the driver and passengers from the side of the torpedo, or under the feet from the side of the seats.
It is easy to buy lighting for your car interior, just call our store, or order through the website, sending the goods to the basket, delivery in Moscow is carried out on the day of the order, or the next day. Sending to the regions of Russia is carried out by mail or a transport company.
One of the most common types of car modifications is additional lighting. With its help, you can create a unique, completely individual image that will undoubtedly attract the attention of others.

Of course, you can choose from many ready-made options, or resort to the help of professionals. However, if you have certain skills, self-creation additional lighting in the car will cost much less, besides, it will allow you to do everything exactly the way you want. Therefore, we will talk about creating lighting in the car with our own hands.
Interior lighting types
Do-it-yourself lighting in the car interior should begin with the choice of lamps. Each of these options has its advantages and disadvantages, but today LEDs are used more and more. And this is due to the following benefits:
- Safer than neon lamps - cannot cause fire if damaged, stronger, does not contain mercury;
- Less electricity consumption;
- Easier to install and use;
- The light can be directed in the right direction.
- In addition, diode tapes become cheaper every year, which also contributes to their popularization.

Interior lighting planning
Before you start to implement the backlight in the car with your own hands,it is worth at least roughly estimating the scheme for installing additional lighting. This is one of the main advantages of creating a backlight for a car with your own hands - the ability to do everything based on individual wishes. Think about where you would like to create additional lighting, how you plan to power it, etc.
Most often, the backlight is placed in the following places:
- Under the glove compartment by the front passenger;
- Under the dashboard of the driver;
- In the luggage compartment;
- Beside the rear seats.
LED-backlight can be powered even from the cigarette lighter, and of course you can connect it directly to the battery.

It is important enough to remember that in such things the main thing is to be careful not to overdo it with the intensity of the light. Creating a beautiful and “polite” interior lighting with your own hands requires a good sense of taste and moderation.
In addition, it is necessary to consider ways to turn on the interior lighting of the car. The most popular are the following three options:
- Switching on from the button;
- Switching on when opening doors or trunk;
- Activation of the backlight when the ignition is turned on.
What do you need to install interior lighting with your own hands?
After you have chosen the layout of the LED strips, chosen their color, you need to ensure that you have all the tools and materials that you need to create the backlight in the car with your own hands, namely:
- pliers;
- Soldering iron for 220V;
- Rosin and tin;
- Stationery knife;
- LEDs;
- Adhesive for fixing the tape;
- Means for degreasing surfaces;
- Indicator;
- Multimeter;
- Cable;
- Switch;
- Screwdriver Set;
- Terminal blocks for fixing wires;
- Tubes, heat shrink, electrical tape for cable insulation.

Do-it-yourself interior lighting installation
First, you need to measure the right amount of LED strip and cut it into special marks. Next, you need to solder the diodes to the wires of the desired length, the resulting contacts must be insulated and the terminals placed on them. For additional protection of the wires, it makes sense to place them in flexible tubes.
The next step in creating polite interior lighting with your own hands is to install LED strips in the right places. To do this, you first need to degrease the surfaces to which you will stick the diodes after applying the degreasing liquid, you need to wait from three to five minutes. Most LED strips come with an adhesive backing, but it's best to use glue as well.
During the installation of LED strips, it is extremely important to monitor exactly where the light will be directed. Lighting should not hit the driver’s eyes, moreover, the resulting result will depend on the direction of the light. Therefore, before gluing it, it makes sense to experiment with the location of the diode tapes.

Wires must be laid under the floor of the car. You can connect to the standard wiring in different places, such a place can be a fuse box. In addition, the power supply for the LEDs can also be routed using existing lights, etc. In addition to connecting to the car battery to provide power, you need to connect the backlight to the "ground", that is, solder one of the wires to the car body (but only to clean metal without dirt, rust, paint).
In any case, when installing the car interior lighting with your own hands, you must first take into account the features of the internal wiring of your car.