The Chevrolet Niva braking system, as a joint product of two global companies, is well adapted to Russian roads and has a minimum length stopping distance when driving in the city. What are the features of this system?
The machine has two independent brake systems - a working hydraulic and parking mechanical system.
The parking brake is applied during a stop to fix the car on the parking place. It uses brake pads on the rear wheels only and is actuated by a lever located in the cab. When the lever is in the upper position, the brake pads move apart and are pressed tightly against the inner surface of the brake drums, firmly fixing their position. The pads are moved using a cable and drive levers.
- contour "right front-left rear";
- circuit "left front-right rear";
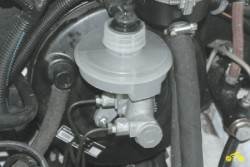
- master cylinder reservoir;
- brake master cylinder;
- vacuum booster;
- brake pedal;
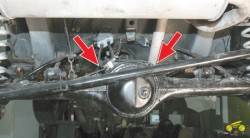
- rear brake pressure regulator;
- parking brake cable;
- rear wheel brake;
- parking brake adjuster;
- parking brake lever;
- front wheel brake
The device of the working hydraulic system
The hydraulic braking system of the Chevrolet Niva, in order to increase the reliability and safety of control, is built according to a dual-circuit diagonal scheme. The first hydraulic drive circuit controls the front right and rear left wheels, and the second drive controls the front left and rear right wheels. Thus, maintaining controllability in the event of failure of one of the hydraulic drive circuits is achieved. Hydraulic system braking includes:
- brake pedal located in the cab under the right foot of the driver;
- vacuum pedal pressure booster;
- master cylinder with reservoir brake fluid;
- double-circuit hydraulic drive pipeline;
- working brake cylinders of the rear and front wheels;
- pressure regulator with actuating lever.
The pressure of the driver's foot on the brake pedal is amplified by the vacuum booster and transmitted to the master cylinder piston, which, moving, compresses the brake fluid. The fluid pressure increases and is transmitted through pipelines to the working cylinders of the front wheels and the rear wheel brake pressure regulator. The pistons of the front calipers and rear working cylinders, under the pressure of the brake fluid, extend and press the Chevrolet Nivak brake pads on the surface of the discs and drums, slowing down their rotation.
Purpose and operation of the pressure regulator

The pressure regulator ("sorcerer") is designed to prevent the car from skidding during heavy braking. This is achieved due to the fact that the rear wheels start to slow down after the front ones. The time delay is provided by the regulator lever, which, when the machine is sharply braked (the nose drops and the rear rises), pulls the piston in the regulator cylinder and closes the fluid supply channel to the working cylinders of the rear wheels.
In this case, the rear brakes do not work and the wheels spin until the back of the car drops back. Thus, the "sorcerer" automatically regulates the fluid pressure in the path of the rear cylinders in inverse proportion to the load on rear axle. In addition, it increases the braking efficiency of an empty vehicle when the load on the front axle is higher than on the rear axle.
If the car brakes inefficiently, breaks into a skid or leads to the side, then this is a reason to check and adjust the regulator.
This work needs to be done on every maintenance and after the repair of the rear suspension.
Brake pads Chevrolet Niva

Niva Chevrolet uses disc brakes on the front wheels, and drum brakes on the rear wheels. Accordingly, the pads on them are different. Pads are the main working part of the brakes, which carry a large load and wear out the fastest. With intensive use of the car, the condition of the pads should be checked at least once every six months. Today, there are many different domestic and foreign manufacturers of pads for Niva-Chevrolet cars.
They differ in price, material, service life. The most effective and "cool" are the so-called "Kevlar" pads. Japanese company NIBK. They are made using modern nanotechnology from a compound that is equally effective in various operating modes. The advantages of this pad model include:
- low heating temperature during braking;
- do not require heating in winter;
- do not creak or squeal even during sudden braking;
- have a long service life compared to other models.
The disadvantages of these pads can only be attributed to the high cost, but the price corresponds to the quality.
If you need information about replacing the front pads, then you.
From time to time, any brake system can malfunction. Not a single car is protected from a malfunction, and especially if it is not always properly operated. A very common maintenance procedure that you will have to deal with is pumping. With the help of the latter, you can get rid of air bubbles in the brake fluid, which interfere with normal braking, or even lead to system failure. Fortunately, it is easy to do it at home with your own hands. Also, the following problems can happen with the Niva brakes:
- When braking, the car begins to pull to the side.
- During braking, the pedal just starts to tremble.
- Before the moment of braking, a knock is heard.
These manifestations indicate that everything is not so good with your brakes. As for the first two cases, here, most likely, only the replacement will help brake pads or cylinders - they will tell you for sure in the service. The third manifestation says that you just need to tighten the caliper mounting bolts more.
Reading 2 min.
Today's article is devoted to the Chevrolet Niva car and its brakes. Consider the nuances of operation and repair.
Chevrolet Niva is a product of the joint development of two companies, and a car came out that is quite comfortable and completely ready to drive on our roads. This amazing synthesis has become very widespread among us and is quite satisfactory for most of our consumers. Today we are interested in the braking system of this car, which is designed for off-road driving conditions and the shortest possible braking distance in urban driving conditions. Let's figure out what systems are installed here and how the mechanisms differ from others.
General device
Chevrolet Niva combines two subsystems. Each brake system has its own purpose, they are called:
- Working.
- Parking.
The purpose of the latter is very clear, this braking system ensures that the Chevrolet Niva jeep is kept in one position when it is parked on an uneven surface for a long time. The brake system, called the working one, is regularly used when the car is moving. With its help, the driver slows down at traffic lights and stops the car where he needs it. You can control its operation using the foot pedal, which is located to the left of the gas pedal and to the right of the clutch, if it is, of course, present.
Principle of operation
On the Chevrolet Niva, it was decided to use the standard hydraulic drive system operation and combined mechanism. A disc brake was installed on the front axle, and a drum brake on the rear, as in the classic version of this car. But, unlike the original version of the car, the drive was modified. This brake system received a vacuum booster applied to the pedal force and a more advanced master cylinder.
The disk mechanism of a Chevrolet Niva car has two main parts: a disk and a caliper. The disk has a tight engagement with the wheel hub and rotates with it, that is, the disk is a moving element. The caliper is mounted on a special bracket above the disk. Inside it are inserted pads and working cylinders that press the pads to the disc. The drum has a slightly different design, here the movable part is performed by the drum body itself, which hides wider pads inside. Here, too, the working cylinders press the wider pads against the horizontal plane of the drum. This design has a higher coefficient useful action due to wider and longer pads. In addition, here all the mechanisms are hidden inside the drum and are completely protected from external influences. This is very convenient if the machine is often used in off-road driving conditions.
Checking and adjusting the brake system Chevrolet Niva
Checking the tightness of the hydraulic drive
Check the tightness by external inspection:
top from under the hood;
from the bottom of the car (on a lift or a viewing ditch);
sideways with wheels removed.
Inspection of the part of the hydraulic drive working under pressure, conduct with an assistant. He should press the brake pedal 4-5 times (thus creating pressure in the hydraulic actuator) and hold it depressed while you inspect the hydraulic actuator. Inspection of a non-pressurized hydraulic actuator is acceptable, but less effective.
If leaks are found in the connections, tighten the clamps, plugs, nuts.
Replace hoses and pipelines with mechanical damage.
If wheel cylinders are found to be leaking, repair or replace the cylinders.
You will need: a “15” wrench, a special wrench for pipeline nuts, or a “10” wrench.
It looks like a special wrench for pipe nuts.
1. Inspect the master cylinder reservoir,
2. connections of pipelines with the main cylinder.

3. Check for fluid leakage at the connections brake pipes with tees

4. with pressure regulator. If a leak is detected, tighten the ends of the brake pipes (use a special wrench).

5. Carefully inspect the brake hoses. They should not have cracks, tears and traces of rubbing. Press all the way down on the brake pedal. If swelling appears on the hose, it means that the threads of the hose braid are torn and it must be replaced.

6. Check the fastening of pipelines in the holders. Loose or broken holders lead to vibration and, as a result, to breakage of pipelines.

7. Check the condition of the pipelines on the crankcase rear axle.
8. Inspect the hose connection to the wheel cylinder, the front and

9. rear wheels.

Checking the efficiency of the vacuum booster
Upon failure vacuum booster significantly increases the force on the brake pedal, which negatively affects driving. If the effort on the pedals during braking has noticeably increased compared to normal, check the brake booster with the vehicle stationary.
You will need: screwdriver, rubber pear.
1. When idle engine press the brake pedal 5-6 times. Keeping the brake pedal depressed, start the engine. The brake pedal should move forward. If it doesn't, check
2. the tightness of the vacuum hose on the intake pipe fitting and

3. on the check valve. If necessary, depending on the defect, tighten the hose clamp, replace the clamp or hose.

Loose fastenings, damage to parts are not allowed. Tighten loose fasteners, replace damaged parts.
4. To check the check valve, disconnect the vacuum hose from the valve.
5. Remove the valve from the booster housing.
6. Put a rubber bulb on the fitting of a larger diameter (with which the valve is inserted into the amplifier) and squeeze it. Wherein

7. Air must exit through the valve. Release the pear. If it remains in a compressed state, then the valve is working. Otherwise, replace the valve. In the absence of a pear, you can purge the valve with your mouth.

Checking the degree of wear of the brake pads
If the vehicle pulls to one side or a strange noise is heard when braking, check the condition of the brake pads.
1. Put the car on a lift.
2. Remove the front wheel.
3. Check the condition of the pads through the hole in the brake caliper housing. If the thickness of the friction linings is about 1.5 mm, replace the pads.

4. To check the degree of wear of the rear brake pads, remove the rubber plug from the hole in the brake shield and

5. inspect pad linings.

Replace pads in the following cases:
lining thickness less than 1.5 mm;
the surface of the pads is oiled;
pads are loosely connected to the base.

Checking and adjusting the pressure regulator
If the pressure regulator malfunctions during heavy braking, the rear wheels may lock before the front wheels, which will lead to the vehicle skidding.
Check the pressure regulator with an assistant from below the car, mounted on a lift or inspection ditch.
You will need: a screwdriver, keys "10" (two).
1. By visual inspection, make sure that the pressure regulator and its drive parts are not damaged, there is no leakage of brake fluid.
2. Ask an assistant to press the brake pedal.
3. When you press the pedal with a force of 70-80 kgf, the piston should move out of the body, twisting the torsion lever.
To visually determine the movement of the piston, insert a screwdriver between the adjusting screw and the piston lever. When the piston moves, the screwdriver will also move.
4. If the piston remains stationary when the brake pedal is pressed, the pressure regulator is defective and should be replaced with a new one.
Adjustment of the drive of the rear brake pressure regulator is necessary when loosening the bolts of its fastening, as well as after any work related to the removal of the rear axle beam, replacement of springs and shock absorbers of the rear suspension.
5. For adjustment, hang out the rear axle of the car.
6. Loosen locknut 1 of adjusting bolt 2.
.jpg)
7. Wrapping an adjusting bolt a key 1, achieve easy contact of a bolt with the piston lever 2.
.jpg)
8. Turn the adjusting bolt one more turn and tighten the locknut.
9. With the correct adjustment of the drive of the rear brake pressure regulator rear wheels should be blocked during heavy braking a little later than the front ones.
Carry out the check when braking from a speed of 30-40 km/h.
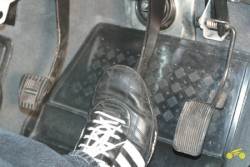
Checking and adjusting the free travel of the brake pedal
If the free play of the pedal is greater than normal, the effectiveness of the brakes is reduced due to a decrease in the total pedal travel. With excessively small or no free play, spontaneous braking and heating of the brakes are possible.
The free travel of the brake pedal with the engine off should be 3-5 mm.
You will need: emphasis, ruler, key "19".
1. Set the ruler near the pedal with its end on the floor, orienting it in the middle of the pedal platform. Mark on a ruler or note the position of the pedal.
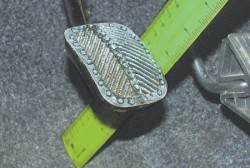
2. Press the stop (you can use the handle of a hammer) on the pedal, moving it until a noticeable increase in the movement force appears. Use the ruler to determine the movement of the pedal, which will be the free play of the pedal.

3. If the free play of the brake pedal is out of range, adjust it by loosening the nut that secures the brake light switch and

4. screwing or unscrewing the switch in the bracket (if there is a large free play, screw the switch into the bracket towards the pedal, if there is little or no free play, unscrew the switch from the bracket, moving it away from the pedal).

5. Check up a free wheeling of a pedal of a brake once again. Tighten the brake light switch mounting nut.
6. Attach the wires to the switch (if they were disconnected) and check the operation of the brake lights.
Checking and adjusting the parking brake
The parking brake should hold the car on a slope of 25% when moving the lever in the car interior for 7-9 teeth (clicks) of the ratchet.
1. To check the correct adjustment of the parking brake, find a flyover, loading ramp, etc. near the parking lot of your car. height H = 1.25 m with a length of entrance L = 5 m. This ratio corresponds to a slope of 25%.

2. In the absence of such a ramp for a simplified check of the parking brake, install the car on a level area. Place the gearshift lever in neutral position, fully raise the parking brake lever in the cabin. Get out of the car and try to move it. If you succeeded, you need to urgently adjust the parking brake actuator.
Adjust the parking brake drive from below the car mounted on a lift or inspection ditch.
You will need: two "12" keys, cobra-type pliers or pliers.
1. While holding the adjusting nut with the wrench 1, loosen the lock nut with the wrench 2.

2. Holding the cable with pliers, wrapping or unscrewing the adjusting nut, achieve a lever stroke of 7-9 clicks.

3. Tighten locknut.
4. Perform several full strokes of the lever, then lower the lever to the stop.
5. Turn the rear wheels by hand. They should rotate evenly, without jerks. Otherwise, repair the parking brake actuator or brake mechanisms rear wheels.
Checking the effectiveness of the brake system
It is desirable to check the efficiency of the brake system on special brake stands (similar to those used by the traffic police during the annual technical inspection of cars). In extreme cases, an approximate comprehensive assessment of the operation of the brake system can be carried out on a flat horizontal area, closed to traffic. It is desirable that the site be covered with a thin layer of sand.
Accelerate the unladen vehicle (excluding the driver) in first gear to a speed of approximately 15 km/h. Depress the brake pedal sharply until the wheels lock and do not release the pedal until the vehicle has come to a complete stop.
Get out of the car and inspect the brake marks left by the car's wheels. If the brake tracks of the front wheels are somewhat longer than the rear wheels, while the length of the tracks on the left and right is the same, then the brake system is working. Otherwise, repair the system.

The following ratios must be observed:
L lion. per.=L right. per.
L lion. rear=L right rear
L per.> L rear.
Do not abuse this assessment, because it is associated with increased one-sided tire wear.