Not all localities have gas supplied to residential buildings. In such situations, you have to make do with electric stoves. Old models are still in use. They sometimes experience unpleasant situations that require the replacement of certain elements. It would be useful to connect the burner, because it is often the heating elements that fail and require replacement.
Common Models
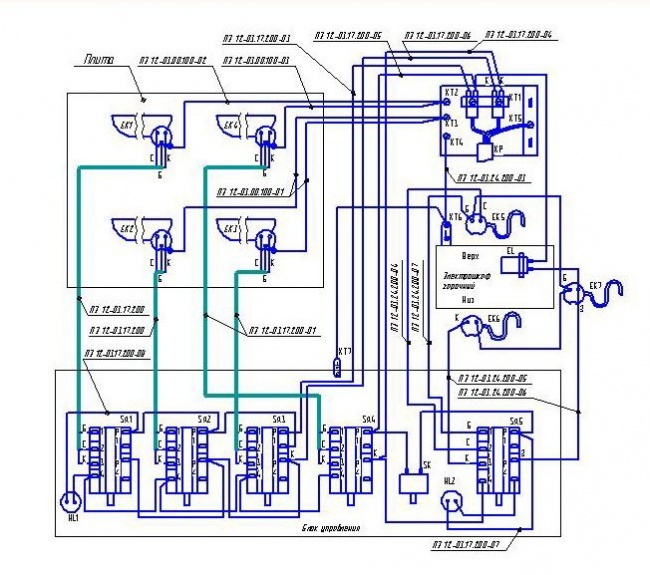
By design, heating elements for old tiles should not break, but it still happens. This may be due to the fact that the tile heater has been idling for a long time after it was forgotten to turn off, or there is a sharp power surge that affects the burner. If mechanical damage in the form of cracks is visible on the surface of the heating element, then we can say for sure that it warmed up to very high temperatures. Initially, the connection diagram is in the product passport. In the case of its satisfactory condition, it is easy to clarify, but most often such documents are lost or have already been thrown away, then you can use the guide that will be given in the article.
Elektra
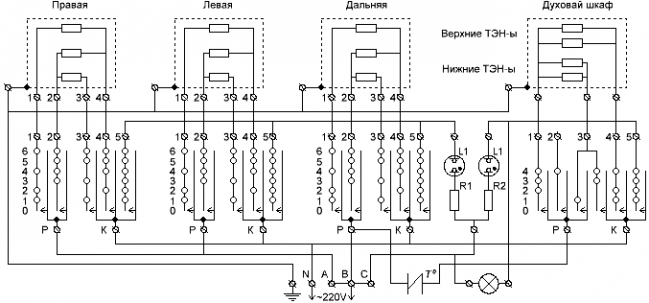
Electra is one of those stoves that were installed in new buildings or purchased on their own. We are talking about a stove with model number 1002. The circuit that was developed by the designers for connecting is not particularly difficult, so even a person who is far from electricity can figure it out. There are four heating elements on the top of the stove. Each of them is indicated by a number from 1 to 4 and has a letter index "H". The first two burners of the stove are exactly heating elements, i.e. tubular heaters. The element with serial number 3 is made of cast iron and has a large diameter of 20 cm. The fourth element is made similar to the third, but its diameter is slightly smaller and is 14 cm.
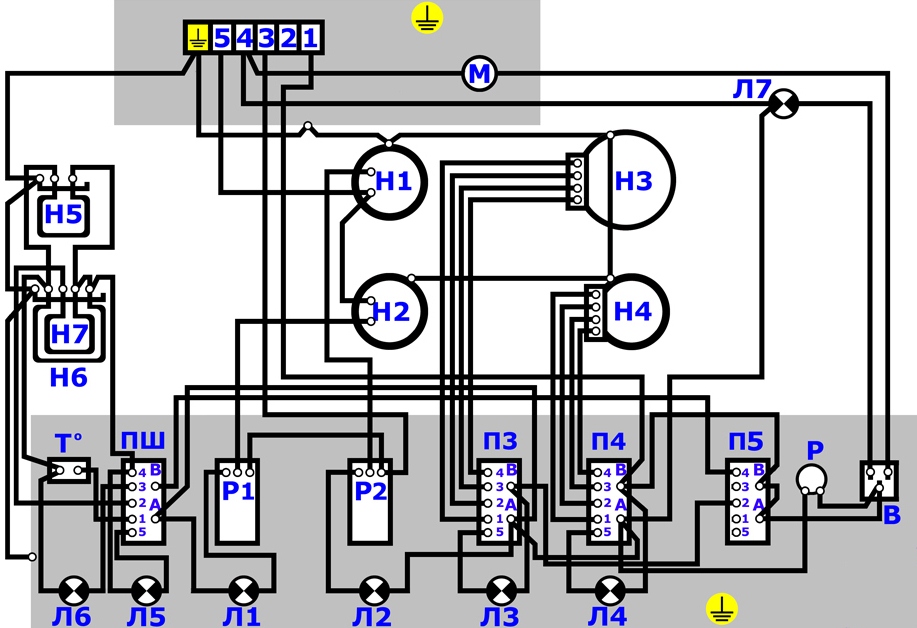
Each burner has its own switch. They also have a digital designation, but the first two have a prefix from the letter "P", and the third and fourth - from the letter "P". The latter have the advantage of adjusting the power in seven steps, which allows you to select the desired mode. The oven of a plate has a separate regulator on three positions. It is abbreviated "PS". Indicator lamps in the diagram are marked with the letter "L" and a serial number from 1 to 4, which also corresponds to the burner number. The oven also has its own lamp, which is marked with the number 5. There are two more heating elements in the oven, which are marked with the numbers 5 and 6 with the corresponding letter. The seventh heater is located at the top of the oven and is a grill.
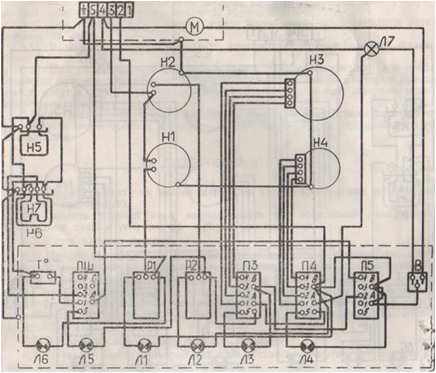
Replacing any of the heating elements is that it is first dismantled from the tile. To do this, you will have to remove the protective caps and trims. During disassembly, you can trace where the conductors from a particular heater go in the stove. If the wires have melted, then you can clarify this point according to the diagram given above. It also contains the procedure for connecting the power line. The new heater is simply installed in the stove, fixed and connected.
Dream
Even more popular than the Elektra was the Dream stove with model number 8. It is a small oven, on the upper edge of which there are two heating elements. On the diagrams for this stove, the heaters that are on the burners are indicated by the numbers 1 and 2, next to them is the letter index "E". Heaters 3 to 5 are inside the oven. The main module, thanks to which the setting is performed, is indicated by the numbers 1 to 4 and has the index S. The design provides light indicators. They could signal the operation of the burners, heating elements inside the oven and just the backlight. In the passport, they are designated as HL and have numbers from 1 to 3.
Note! On the diagram you can also find an element with the designation T-300. This is a thermal relay that was responsible for turning off when a certain temperature was reached.
The stove has the ability to control the intensity of heating. It is produced by switch S1. Due to the closing of the contacts, the electric current flows from the plug, which is designated XP, and through the fuse F is supplied to the heater, which is located in the oven. It is connected in series with the rest of the heating elements that are in the oven. This means that before replacing, it is necessary to determine which particular heater has failed. This can be done by changing the position of the switch to such a position that power is supplied separately to one or two heaters in the oven. Each burner also has its own switch. The diagram shows how the wires go to connect each individual heater.

Lysva
Another manufacturer who has met quite often before is Lysva. For example, below is a diagram that will allow you to replace a burner on a stove that has three main heaters and those in the oven. Each heater on the burner has 6 adjustment modes. The task is performed by increasing or decreasing the resistance of the conductors. The diagram shows the installed resistors. Three of them go to each heating element and four more to the oven. Guided by how the current flows through the circuit, you can easily install a new heater. At the end of the article there will be a video about connecting a burner with four leads.
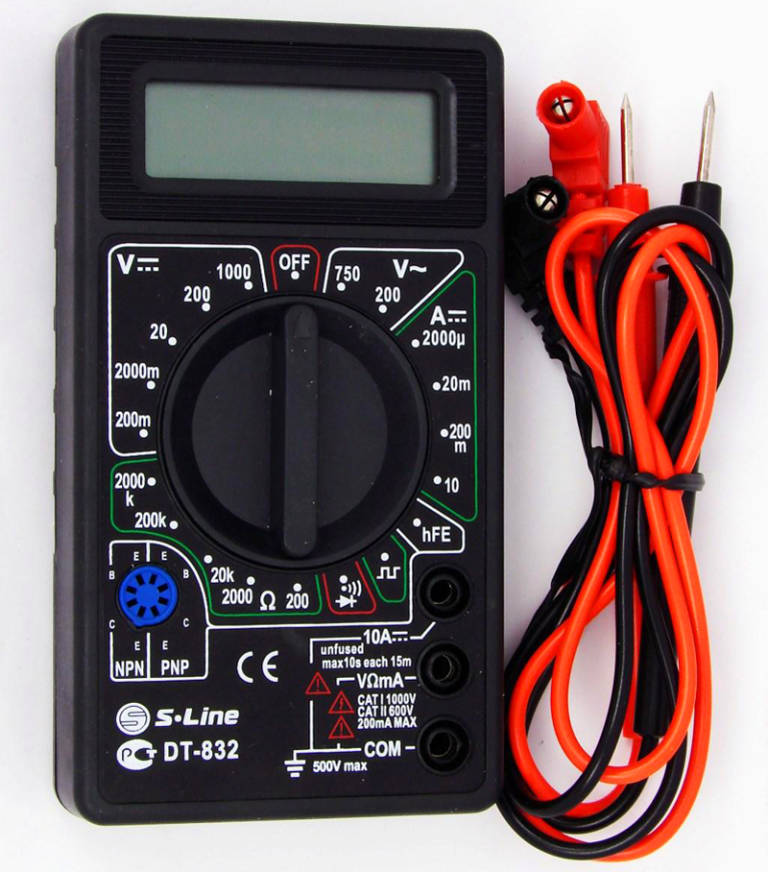
Before proceeding with the replacement of the element on the stove, you need to make sure that it is really out of order. It is almost impossible to do this with an ordinary dial tone, because the heating element has its own resistance. It is the resistance that needs to be checked. The manufacturer specifies what value is normal for a healthy node. It is necessary to fix two multimeter probes on the heater contacts and switch to the resistance measurement mode. At the end of the process, it is necessary to check the reference value.
Note! Resistance measurement must be made on the dismantled heater, otherwise the value of the entire system will be displayed.
During installation, be careful at the connection points. All bare wires must be insulated with electrical tape or heat shrink tubing. Not a single bare wire should touch the body of the stove. When performing replacement work, it is necessary to de-energize the stove. All tools to be used must have dielectric handles that will not miss the discharge that may be in capacitors if they are present in the circuit.
Conclusion
As you can see, having a diagram, it is not so difficult to replace the heater. You should never rush to disconnect any wires. It's best to take a picture of them with your smartphone or digital camera first so you know how to connect in reverse.
According to statistical materials, 20% of the housing stock in Russia are equipped with electric stoves. Question: how to connect an electric stove with your own hands is relevant and for this reason it is placed in the title of the article. This article will answer not only the question of how to connect the electric stove yourself, will allow you to choose the cross section of the wires, consider the connection diagram, but will touch on many topical issues in this area.
The article will also answer the question: How to connect an electric stove yourself with your own hands?
Types of household electric stoves
All electric stoves on the market can be divided according to the type of hob into classic enameled and glass-ceramic.
The top panel of classic enameled stoves is enamelled and has built-in burners. The advantages of these boards are low cost , ease of maintenance and repair.
 Enamelled plates are resistant to mechanical damage. The main disadvantage of these stoves is the long cooking time due to the fact that the burners heat up for a long time, and the energy consumption depends on the duration of the heating of the burners.
In glass-ceramic electric stoves, the hob is made of a single high-strength sheet of glass-ceramic. This coating has a significant thermal conductivity, therefore, in terms of the speed of cooking, such stoves are close to gas ones. Heating of the cooking surface of the glass-ceramic stove occurs quickly in the zone of the burner. Glass ceramic is attractive and easy washable with mild detergents. The disadvantages of electric stoves with glass-ceramic coating: it is prone to scratches when interacting with metal utensils, as well as the high cost of the stove compared to the classic one.
By type of burners, electric stoves are:
- with spiral heater elements;
- tape, in which the heater has the form of a twisted tape;
- halogen with infrared emitter;
- induction (on eddy magnetic currents).
 Oven plays a significant role in the choice of electric stove. Ovens are divided into static and multifunctional. If there is a heating mode at the same time from above and below, while the cabinet is equipped with a mechanical spit, then this oven belongs to the static type. It ensures uniform heating of dishes from all sides.
Multifunctional cabinets use convection, which provides a significant number of cooking modes. This also increases the speed of cooking. Expensive models of electric stoves are equipped with a system automatic oven cleaning. In cheap models, cleaning takes a lot of time.
The most popular manufacturers of household electric stoves are:
- Russia - Dream, Darina, DeLuxe, ZVI, Lysva;
- Belarus - Atlant (Atlant), Gefest (Hephaestus);
- Germany - Blomberg, AEG, Bosch;
- Italy - Ardo, Candy, Indesit;
- Slovenia – Gorenje
- Turkey - Beko, Vestel;
- Sweden - Electrolux, Zanussi.
 Requirements, conditions and components necessary to connect the electric stove to the mains in the apartment.
Household electric stoves are the most energy-intensive equipment of a modern apartment. For this reason, the mains supply must meet certain requirements, which will be discussed below. The maximum declared (passport) power of electric stoves is in the range from 3.3 to 9.5 kW.
The main requirements for connecting a household electric stove are:
- the presence of a separate electrical wire for powering the stove (free from connecting any other load);
- compliance of the electric wire with the plate power rating;
- the presence in the connection panel of a separate circuit breaker, corresponding to the power;
- the possibility of grounding the body of the plate.
Tool required to connect
To complete the work you will need:
- pliers;
- wire cutters;
- knife with a segmented blade;
- wiring phase determinant;
- electrical tester.
Preparatory work
 Before starting work, you must verify and adjust electric stove connection devices, check the conformity of the cross section of the wiring to the power of the connected stove. As a rule, a new plate is not included in the kit. electrical wire, plug and socket, which must be purchased from an electrical store.
Before starting work, you should turn off the old stove, turn off the power outlet, remove the purchased electric stove, how to connect it from the package, read the instructions, and prepare the installation tool.
Electric stove connection options
The overwhelming option for power supply in apartment buildings is the option with a single-phase network with a voltage of 220 V. The figure shows the connection of an electric stove. The connection diagram is given for the single-phase network option.
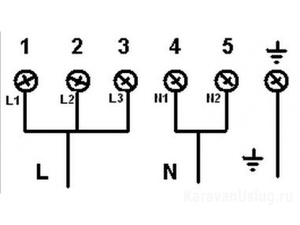
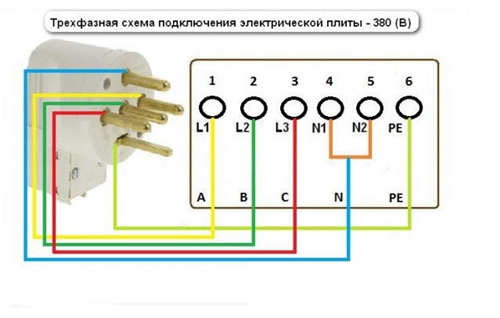
On the back panel of the stove there is a terminal block (in the diagram it is shown in detail with terminals 1, 2, 3, 4, 5 and a ground sign) for connecting a wire, which at the other end will end with a plug.
Terminals 1, 2 and 3 are called phase terminals (letter L in the figure). On the new plate, these terminals are connected by jumpers for connecting the phase conductor L.
Terminals 4 and 5 also connected by a jumper and marked with the letter N. A neutral wire is connected to this terminal (in Russia it is also called “neutral”, zero or “zero”) wire.
The sixth terminal indicates the ground (it can be denoted by the letters PE), to which the ground wire is connected.
Thus, to connect the plate according to this option, a three-core copper wire is required. The cross section of the wire cores will depend on the power of the electric stove. The table shows the cross-sections of the copper wire in mm 2 and the corresponding nameplate power of the stove and the amount of current to power the stove. How to connect an electric stove?
From the stove to the outlet, the connection must be made with stranded wires of the PVS or KG brand with the required cross section of the cores. These grades are resistant to kinks with possible repeated bending during operation.
The power socket and plug must be suitable for the connected load. That is, if the nameplate power is, say, 5.9 kW, then the power socket and plug must be rated for a current of at least 27 A. In this case, a three-phase plug and socket (set) of 32 A are used. The phase core of the plate must fit through socket to a 32 A circuit breaker, which must be located in the electrical panel.
 Accordingly, the zero terminal of the electric stove must be connected through a wire, plug, socket, power wire to the "zero" in the electrical panel. Also connected to the ground terminal.
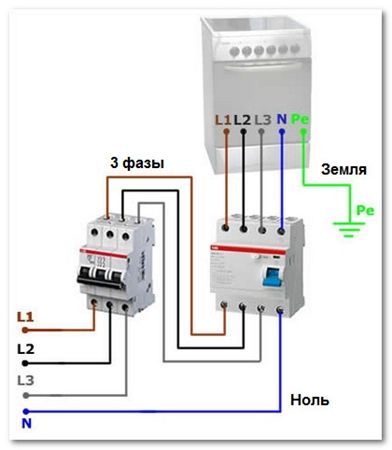
In rural areas or in houses for individual residence, it is possible to supply a three-phase current with a voltage of 380 volts to the dwelling. In this case, to ensure a uniform load, each phase of the network should be connected separately to terminals 1, 2 and 3. Before this, the jumper between the terminals must be removed (see the electric stove connection diagram).
After checking the correct connection of all connections, the plate is checked with the voltage on.
Every home has a stove in the kitchen. This is an indispensable attribute, without which it is very difficult to imagine the life of a modern person. Gas stoves are gradually disappearing into oblivion - they are being replaced by electric stoves. If you know how to handle such a stove, it can last for many years. But before you start using it, you need to purchase a stove, if it is not already there, and carefully study its connection diagram if you want to install it yourself.
First of all, the purchased stove should be unpacked and checked for mechanical damage. If there are any, you need to ask for a replacement.
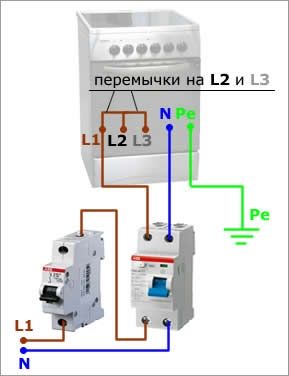
There are three schemes for connecting an electric stove: single-phase, two-phase and three-phase. The electric stove has a terminal connector, which helps to understand which phase to use. However, at present, most apartments are equipped with single-phase electrical wiring, respectively, and the stove must be connected according to a single-phase circuit. To do this, you need to install jumpers in the terminal block. Then you can connect the power cable to the terminal block.
Sockets for connecting an electric stove
Included with the electric stove you purchased should be a cable for connecting it to the mains and a 32A plug. Accordingly, for such a plug, a 32A socket is also required. We pay attention to two nuances: firstly, if you do not have such an outlet, it should be installed in a convenient place, making sure in advance that the cable from the stove will reach it; secondly, the socket should be only European standard. In order to connect such an outlet, you will need to lay another cable to the shield in your apartment, and then power it from a separate machine, which in turn must be rated for maximum current.
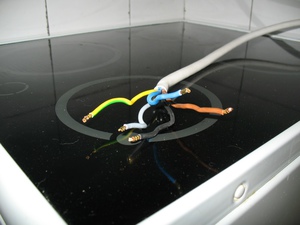
Do-it-yourself connection of electric stove burners

Pay special attention to connecting the burners to your electric stove. Usually, the connection diagram of the burners of the electric stove can be seen in the passport of the stove you purchased. Each burner must consist of the following elements: a steel body, thermal insulation with a removable cover and a terminal block, fixed on the inner surface of the plate of flat heaters.
The burner must be installed in the corresponding cell in the electric stove in such a way that the working surface of the burner protrudes above the surface of the stove. The adjustment screws located in the base of your stove will help to fix the burner in a perfectly horizontal position. Next, you need to connect the power wires to the terminal block screws and tighten the nuts. When connecting the burner, we strongly recommend using the diagrams and instructions, and even better - the help of a specialist. Do not forget that self-installation of burners can ruin your electric stove if they are installed incorrectly.
It is important not to forget, after the self-installation, to check in the electrical panel whether all connections are reliable, whether everything is connected correctly. Only after you make sure that the whole process of connecting the electric stove is done correctly, you can turn on the stove and check it in all operating modes. This is a test run. Only then, when you check the stove in its operation, you can proceed to its further operation. And remember: a properly connected electric stove can work without failure for a long time. If you are not confident in your abilities, then it is best to contact a specialist.
When working on the electrical network, always turn off the power. Usually, hotplates of the latest modifications are sold without a connecting cord. The connection of the electric stove must be carried out using high-quality terminals. And it uses a wireless connection. This connection allows the use of longer wires with fuses. True, sometimes you can use a power outlet. It is important that the current of such an outlet is at least 32 amperes.
Independent connection of the electric stove is also permissible, however, it should be borne in mind that the core diameter in the cable is at least 4 mm. If the cable length exceeds 12 meters, then the diameter of the copper core must be at least 6 mm. Moreover, the cable must be protected by an autonomous fuse-machine.
Electric stove connection diagram
The scheme for connecting an electric stove of this type is called radial. There is also a ring pattern. With this connection scheme, several sockets can be placed on one cable. It is forbidden to connect several electrical appliances through a bug.

To answer the question of how to connect an electric stove with your own hands, you should know how many connection schemes there are. Moreover, connecting a built-in electric stove is no different from connecting an autonomous stove. There is a single-phase, two-phase and three-phase electric stove connection system. Since a single-phase system is common in our apartments, the stove should also be connected according to a single-phase circuit. For this purpose, appropriate jumpers are installed in the terminal block. Then the power cable should be connected to the block. The socket must be installed in the place of your choice so that the length of the cable is enough.
Particular attention should be paid when connecting the electric stove to connecting the burners. The connection diagram of the burners can be found in the passport, which is attached when buying an electric stove. Typically, a burner includes a steel body, a terminal block, thermal insulation and flat-type heaters.
The heating element is installed in a cell of the appropriate size. The surface of the burner must be above the level of the surface of the stove itself. There are special screws that adjust the horizontal position of the heating elements. The cable cores are attached to the screws and clamped with the appropriate nuts. Connecting the burner is a rather laborious and responsible process. If the heating elements are installed incorrectly, the electric stove can be damaged.
After you have installed the burners in the electric stove, you should check whether the connection is made correctly in