Good day!
Today, together with the author of this article, we will try to make a bicycle rack for parking bicycles. We will use the materials available to us, which will undoubtedly make the construction cheap. Attached is a detailed description, + photo report.
To create a homemade product, we need:
Tool:
Drill;
- cutting tool (saw or hacksaw).
Materials:
PVC pipes;
- corner fittings, 12 pcs.;
- tees 4 pcs.;
- a piece of board or thick plywood, 45 x 12 cm;
- door latch;
- self-tapping screws.
Let's start by sawing a plastic pipe into the following dimensions:
- 35.56 cm, 2 pcs.;
- 13 cm, 4 pieces;
- 17.78 cm, 4 pieces;
- 16.51 cm, 2 pcs.;
- 10.16 cm. 2 pcs.;
- 5.08 cm, 10 pcs.
We will make a locking mechanism for the rack, for this we take a piece of plywood of a certain length and at a distance of 25 cm from the beginning of the board we fasten the door latch, an important point - the width of the plank should be narrower than the latch by 4 - 6 cm, the ends should protrude. We use self-tapping screws as fasteners, their length should not be thicker than plywood.


Next, we take the corner fittings, and at a distance of 3 cm, we drill holes, the ends of the latch will go into them.


Then, two tubes must be connected to these two corner fittings, each 24.13 cm long, after which we fasten a pair of tees on the other side.


Next, we attach small segments of tubes to the tees, each 5.08 cm long, and between them we make a small insert from a pipe 10.16 cm long. We assemble all the prepared parts together.


Two more details need to be made for the design. We take a small piece of pipe 5.08 cm, connect it to the corner fitting, then connect a pipe piece 24.13 cm to it, after that we put a tee, after it another insert from a pipe measuring 16.51 cm. We make such parts in the amount of two pieces .

Putting everything together.

Next, you need to assemble the following parts in series: we take a small piece of pipe 5.08 cm long, connect an angle fitting to it, then again insert a 5.08 cm insert and connect it to another angle fitting. We produce such parts in the amount of two pieces.

Putting all the parts together, the resulting design will be the base of the rack.

Now we take four pieces of pipe, each 17.78 cm long, and put them vertically in tees.

Next, we take a tee and an angle fitting, between them we put a small piece of pipe measuring 5.08 cm, you need to make two identical pieces. Then, when everything is ready, we put them on vertical racks.


Then we take two pieces of pipe each 35.56 cm long and insert them into the holes of the tees.

Next, we assemble the top of the rack, for this we take a couple of corner fittings, put a small piece of pipe 10.16 cm long between them, install the resulting part on vertical racks.
Most of the Minsk bike racks are inconvenient. They do not allow you to properly fix the bike, ensure its stability. This leads to the fact that cyclists do not use them, but prefer to park nearby.
What is a good bike rack?
1) The bike must be stable on a level surface. It should not tip sideways or roll forward/backward. Both wheels must be in contact with the pavement, neither of them should be lifted by the pavement curb or metal structures of the parking lot, if this would impair stability.
2) Avoid structures that hold the bike by one wheel!!! The bike should touch the rack with the frame, not the wheel. This prevents the bike from falling when the wheel is turned out if someone hits the bike. Such an eversion can lead up to the breakage of the wheel - the appearance of the figure eight.


In addition, when designing such a stand, one must take into account the width of the wheel, which varies from 23 to 80 mm, therefore, parking for one type of bicycle may become unsuitable for another.


3) Parking should allow you to attach the bike to the frame and both wheels at the same time. The correct fixation of the bike is by the frame, but there are those who prefer to additionally fix one or both wheels.

If the user is forced to fix only the wheel, then the rest of the bike can be stolen from him.

One of the examples of not very convenient parking. There are eight seats, and only two cyclists with reliable U-shaped locks can park comfortably:

Design
One of the best options for bike parking is the U-shaped (inverted U) design. It is inexpensive, easy to install and fits into the outdoor environment. One such rack can park two bicycles. The shape of the rack allows you to fix the bike with locks in two places and use reliable U-shaped locks. The distance between adjacent posts should be 750 - 850 mm.
By the way, we express our deep gratitude to Velcom for filling Minsk with public bike racks. Minsk residents appreciate it:

In fairness, we note that another cellular operator, MTS, also creates excellent conditions:


Material and coating
The cost of a bike rack is determined by the material of execution. The best quality gives the use of stainless steel. Such a bike rack is expensive, durable and looks good in any place. A parking lot made of metal coated with a polymer coating will cost almost half as much. It is important that such a coating is applied to galvanized metal. Well, the most budget option is a painted design.
One of the first bike racks in Minsk already needs painting:

Try not to use rebar, angle or strip metal unless it is part of the artistic intent. As a rule, such bike racks look unaesthetic and lose their shape over time:

Pedestrian comfort and usability
Parking should not be on the usual paths of pedestrian traffic. The easier it is to notice, the more it will be used.
Bicycle parking should be located as close to the destination as possible.
Provide rain protection- it is better to put a bike rack under the canopy of knowledge or make a covered parking lot.
Accommodation.
Bicycle parking should be clearly visible from inside the buildings, as well as from the outside.
The location of the bike parking in the backyard, near the garbage cans, away from the main streams of people is unacceptable, as this creates convenient conditions for thieves and vandals.
The parking stand must be well secured and must withstand the mechanical impact of hand tools such as bolt cutters, pipe cutters, wrenches and pry bars.
To ensure security, building guards should be involved. It is advisable to place the bike rack in the visibility zone of security guards, CCTV cameras, and provide good lighting.
The best and inexpensive solution is to use a patio. In such places with limited access, bicycles may not even be locked. Such a bike rack will be appreciated by employees, but for third-party visitors you will have to make another one. Yard of the Minsk company itransition (photos by citidog.by):

The most serious solutions are specialized indoor bicycle parking with limited access. Everyone who enters or leaves will be recorded on the server. Shared bike parking by System Technologies and EPAM (photos by citidog.by):


The last but not least
Get creative, make the bike rack beautiful!


![]()

Materials that will allow you to make a beautiful and reliable bike rack:
|
|
If you have cyclists in your house, then bike parking has probably already become a pretty necessary thing that you are already thinking about purchasing. After all, it is clear to any of us that it is much more convenient to easily place the bike neatly in an already installed rack than just throw it on the ground or look for somewhere to lean it. It is possible that many of you have already tried to find something similar on the Internet, entering search queries like “buy a bike parking lot” or “draw a bike parking lot”. Today I will tell you how to make this simple device with your own hands, while spending a minimum of money, effort and time.
Do-it-yourself bicycle parking: what is required for this
A bike rack can be made with the following materials and tools:
- ordinary wooden pallet;
- a screwdriver that will also be used as a drill;
- jigsaw;
- Sander;
- 2 large brackets, similar to the one shown in the photo;

- 5 small metal corners;

- pencil, ruler, eraser;
- brush;
- outdoor paints;
- self-tapping screws;
- colorless varnish.

Speaking of pallets. They can be used for a lot of things. For example, they can be used to make very functional garden furniture. If you want to know how to make it, go here!
How to make a bicycle parking rack
- Lay the pallet so that the side with the most slats is on top. Draw a line on the first rail just below the checker (a checker is a piece of timber that fastens the two sides of the pallet). Repeat the operation on all rails of the pallet.

- According to the marked markings, cut with an electric jigsaw. So the pallet will be divided into two parts along its upper side.

- Then we move on to the bottom side. To do this, turn the pallet over and mark the side and middle rails. Saw them with a jigsaw according to the markup. As a result, you will get two halves of the pallet. One of them is larger, since it includes two transverse rails. In the other half, there is only one transverse rail.
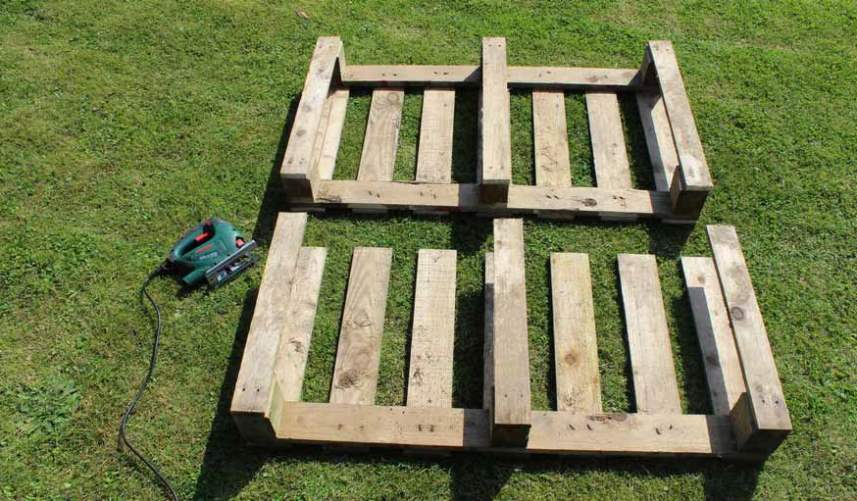
- Sand both parts of the pallet.

- Place the largest part of the pallet upright. Attach its smaller part to it horizontally. Install large brackets in the center of the side rails.

- Fasten the brackets with self-tapping screws.

- Enter from the other side of the assembled structure. Fasten the rails of both of its parts with metal corners planted on self-tapping screws.

- Now the future bicycle parking is to be decorated. Choose 3 paints of matching colors for this. To facilitate the painting process, unscrew the large brackets (the structure will not fall apart due to the presence of metal corners fixed at the back). However, the brackets, in principle, can not be unscrewed.

- The top of the bike rack can be painted with flags, for example. To do this, draw horizontal lines at a distance of 20 cm from the top. On these lines, find the midpoints and connect them to the top corners of the rails.

- Apply painter's tape along the markings.

- One of the colors paint 3 flags and 3 horizontal rails.

- Alternate colors when painting. Do not forget to paint the ends and sides of the rails and checkers.

- Let the paint dry and remove the masking tape. Erase the pencil mark.

- Replace the 2 large brackets if removed.

- Small hooks can be useful for hanging helmets. Drill holes on the sides of the inner checkers with a drill. Screw in the hooks by hand.

- Bicycle parking will look prettier if it is varnished. In addition, it will protect it from bad weather. After applying the varnish, the rack is completely ready.

- Now you can install bicycles in the finished rack.

So, you can see that do-it-yourself bicycle parking is quite easy. The described sequence of actions is only a kind of canvas on which you can impose your own ideas and improvements. This will allow you to make a rack that will delight you for a long time both with its appearance and the convenience it brings to your life.
You won't miss any of our content if you subscribe. It is very easy to issue it: just enter your e-mail in the form under this article and click on the "Subscribe to the newsletter" button. And you will always be aware of our publications!
The use of a bicycle as a vehicle is becoming a popular trend in our country. At the same time, abroad this method of transportation has long been considered not only convenient, but also beneficial to health. The development of cycling led to the construction of special bicycle parking lots, which made it possible to integrate bicycles into the transport system of foreign countries. In our country, there are practically no such parking lots for bicycles, which makes many people make them on their own and look for a drawing of a bicycle parking with dimensions.
It should be understood that blind copying of the Western experience in organizing bicycle parking in our country will not take root. Rare authorities of Russian cities will take on the local budget the costs of creating bicycle parking. For this reason, the main burden will fall on the owners of large hypermarkets and other retail facilities seeking to:
- attract more buyers;
- provide them with maximum comfort.
It is the owners of various buildings and structures who independently organize bicycle stands near the main entrances, which, by the way, can be purchased here http://stolzgrupp.ru. But even they create structures that are far from the aesthetic beauty of European counterparts, although they solve the main tasks:
- provision of a place for a bicycle;
- ensuring the safety of the vehicle.
Each do-it-yourself bicycle parking, the drawings of which are publicly available on the Internet, should protect the owner of the bicycle from his possible theft. It is this fear that keeps cyclists from visiting the store or office. Seeing that the owner of the object cares about his customers or visitors, the cyclist will give preference to just such a businessman. An improperly designed or installed bike rack will frustrate the cyclist and force him to look for a more secure rack.

For this reason, the organization of parking spaces for bicycles is an important decision that a successful businessman must implement near his building or structure. When considering bike parking dimensions drawings and proposed designs, there are two main types of bike racks to keep in mind:
- short-term - allow you to leave the vehicle near the entrance for several hours;
- long-term - provide additional protection to the vehicle from external influences and are located in a specially designated space.

The main options for short-term parking for bicycles, which are more in demand, are:
- rack - the whole bike is held;
- fence - a bicycle wheel is fixed;
- standard bike rack - a design that combines several racks on a single base.
Any bicycle parking should be selected based on the surroundings. We must not forget about the aesthetic component and the compliance of bicycle parking with the general principle of improvement.