Spark plugs should be changed immediately when they fail. A scheduled update should be done every 30 thousand kilometers. There are several indicators indicating the need for an unscheduled replacement of spark plugs, namely: unstable engine operation, poor starting, excessive fuel consumption, poor throttle response or engine tripping.
You can evaluate the condition of the candle based on external signs. For convenience, a table will be given below, with the help of which it will also be possible to understand whether your car needs spark plug replacement .

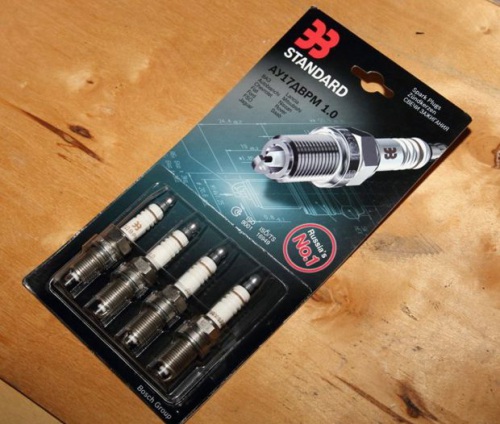
Before starting the replacement, of course, you need to purchase new candles in the auto shop.
Do-it-yourself replacement of spark plugs Lada Priora 16 valve
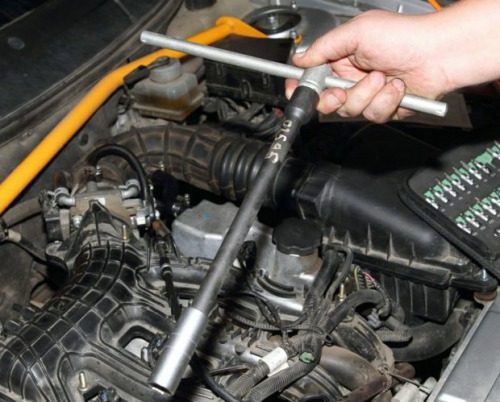
Replace spark plugs Lada Priora you need a special socket wrench to "16" with an extension cord. The candle key or head must contain a magnet to hold the candle in place.

Do-it-yourself replacement of spark plugs Lada Priora 16 valve
Algorithm for replacing a spark plug VAZ 2170, 2171, 2172 Lada Priora
- Remove the decorative plastic cover.
Do-it-yourself replacement of spark plugs Lada Priora 16 valve

Do-it-yourself replacement of spark plugs Lada Priora 16 valve
Also check out

Do-it-yourself replacement of spark plugs Lada Priora 16 valve
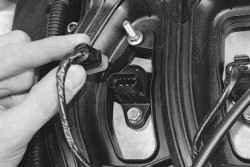
- Disconnect the ignition coil terminal.

Do-it-yourself replacement of spark plugs Lada Priora 16 valve
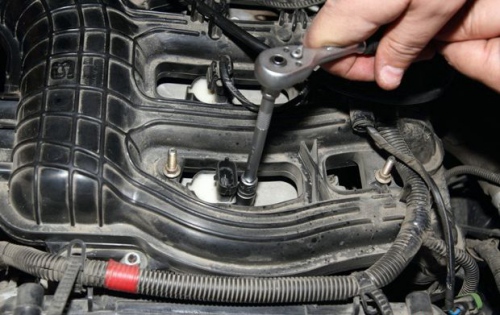
- Unscrew the coil fixing screw.
Do-it-yourself replacement of spark plugs Lada Priora 16 valve
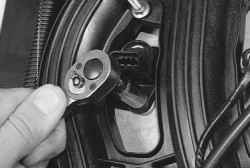
- Remove the ignition coil with a flathead screwdriver.

Do-it-yourself replacement of spark plugs Lada Priora 16 valve
Do-it-yourself replacement of spark plugs Lada Priora 16 valve
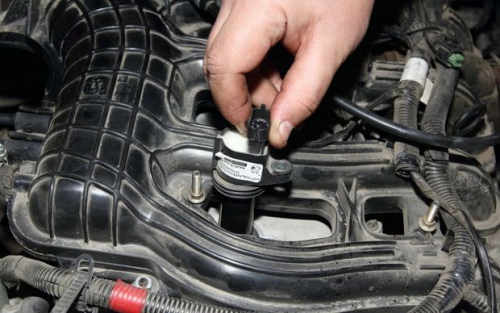
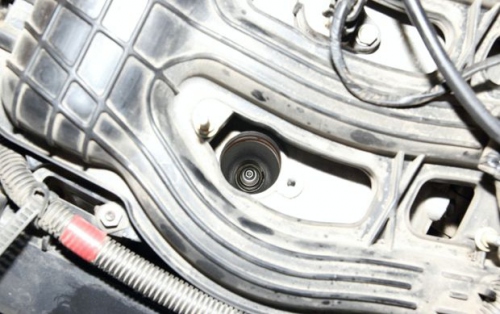
- The candle is located in a recess (candle well), an extension cord is needed to remove it.
Do-it-yourself replacement of spark plugs Lada Priora 16 valve
- If there are traces of oil in the candle well, it is necessary to find out their origin. You may need an emergency.
- If before this spark plugs have not been replaced, to extract them, you need to make an effort, so this cannot be done with a simple candle key. You will have to purchase a specialized candle end head, equipped with a knob.
- Carefully unscrew the spark plug so as not to damage the spark plug insulator, since then it will be almost impossible to get the fragments (if they are in the cylinder, disassembly of the block will be required).

how to replace candles on a VAZ 2170
- Dismantle the candle from the well. If this does not work right away, you need to use the removed ignition coil (put it on the candle shank, try again).

Do-it-yourself replacement of spark plugs Lada Priora 16 valve
- Assess the condition of the removed candle according to the table above. If the spark plug insulator is clean and does not fall into these categories, the motor is fine.
- Install a new candle in the head, put everything in its place.

Do-it-yourself replacement of spark plugs Lada Priora 16 valve
- Note! First twist the candle without using a wrench. The candle should spin easily. If the cylinder head threads are stripped, expensive repairs will be required.
- After the candle is screwed in, you need to tighten the candles with a knob.

Do-it-yourself replacement of spark plugs Lada Priora 16 valve
- Reinstall the ignition coil, after which you can tighten the mounting bolt and put on the connector.
Perform this procedure on all spark plugs.

The ignition system does not use a traditional distributor.
here individual ignition coils are used.
There are no moving parts in the ignition system, so it requires no maintenance or adjustments.
In the ignition system, candles of the AU17DVRM type or their foreign counterparts are used. More details about spark plugs can be found in the section "Spark plugs: spark plug device, basic parameters and fault diagnosis of spark plugs"
In the ignition system of a VAZ 2170 2171 2172 Lada Priora ( Lada Priora) the ECU monitors the distribution and moment of spark occurrence in the cylinders. Sparking occurs sequentially in those cylinders in which the compression stroke ends and, accordingly, the order 1–3–4–2 is observed. crankshaft position sensors camshafts pulse "reference" signals are fed to the computer, on the basis of which the computer calculates the sequence of operation of the ignition coils. To accurately control the ignition, the ECU uses the following information:
- rotation frequency crankshaft;
– engine load (mass air flow);
– coolant temperature;
- the position of the crankshaft;

– position of camshafts;
- the presence of detonation.
2. Removal and installation of ignition coils on the VAZ 2170 2171 2172 Lada Priora.
You will need a socket head "10".
1. Disconnect a wire from the minus plug of the storage battery.
2. Remove the decorative casing from the engine (see "Removing and installing the decorative casing of the engine").
The ignition system does not use a traditional distributor...
In the ignition system of a VAZ 2170 2171 2172 Lada Priora (Lada Priora), the ECU monitors the distribution and moment of the spark in the cylinders. Sparking occurs sequentially in those cylinders in which the compression stroke ends and, accordingly, the order 1–3–4–2 is observed. The crankshaft and camshaft position sensors provide the ECU with pulsed "reference" signals, on the basis of which the ECU calculates the ignition coil firing sequence. To accurately control the ignition, the ECU uses the following information:
- frequency of rotation of the crankshaft;
– engine load (mass air flow);
– coolant temperature;
- the position of the crankshaft;
– position of camshafts;
- the presence of detonation.
2. Removal and installation of ignition coils on the VAZ 2170 2171 2172 Lada Priora.
You will need a socket head "10".
1. Disconnect a wire from the minus plug of the storage battery.
2. Remove the decorative casing from the engine (see "Removing and installing the decorative casing of the engine").
3. Wring out the plastic clamp of the electrical wiring connection block
4. ... and disconnect the wiring harness block from the coil output.
5. Turn out a bolt of fastening of the coil of ignition to a cover of a head of the block...
6. ... and remove the coil from the candle well.

P Notes This is how the Lada Priora ignition coil removed from the car looks like.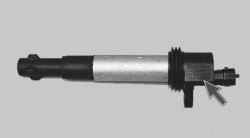
Pay attention to its marking in order to purchase a similar coil for replacement.
The ignition coils are interchangeable and can be installed in any order.
7. Install the ignition coil in the reverse order of removal.
Ignition timing can only be checked if no faults have been registered in the memory device. Ignition is controlled when the engine is running at Idling. All vacuum hoses must be connected to fittings. The damper has a mark Z (fig.) of the ignition moment. The mark on the belt pulley, when properly adjusted, should be in front of this mark.
To set the ignition timing:
Perform an idle speed test. If perfect idling cannot be achieved, then it makes no sense to control the ignition timing. The ignition timing must be checked and, if necessary, adjusted if the distributor has been dismantled or replaced. If the idle speed is unsatisfactory, then at least it is possible to start the engine in order to get to the car repair shop, where the idle speed will be adjusted;
Connect the stroboscope according to the manufacturer's instructions (Fig. ). The device used must be suitable for electronic system ignition;
With the engine idling, point the lamp beam at the crankshaft belt pulley and check if the ignition timing is in line with the ignition setting mark. For all engines, the ignition timing should be in the range of 2–7°. The initial condition for this is an engine warmed up to operating temperature (oil temperature not less than 80 ° C);
If the ignition timing setting is within the specified range, then the ignition timing setting is not necessary. These values indicate the position in degrees relative to top dead center;
If you cannot do without setting the ignition timing, then you should loosen the distributor mounting bolts and deploy it. In this case, it will be possible to quickly establish in which direction the ignition timing mark “floats away”. At new installation ignition timing, it is always necessary to strive to bring the setting up to 5 ° before TDC. A deviation of ±1° is, however, permissible;